Pandemic Do-It-Yourself
Clean Your Brake Pistons!
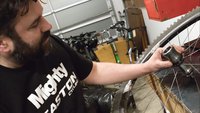
Before we dive too deeply into this mildly technical task, I need to come clean about my experience as a mechanic. I worked in 4 different Vancouver bike shops over a span of about six years. Most of it was part time or during summers while going to school but one year I worked six days a week mostly wrenching. Overall I probably spent more time on the tools than doing sales by a 70:30 margin, and I learned some stuff about fixing bikes. Cantilever brakes, V-brakes, side-pull, and even U-brakes; all the rim brakes were in my wheelhouse. Unfortunately my shop time, in the primordial mid-to-late 80s, pre-dated disc brakes, and was even before suspension, so I have some gaps in my expertise, and there's no quick way to reproduce the endless task repetition you get working in a shop. I didn't manage my 10,000 hours but there was a time during my year-long stint at Cap's* when most days felt at least that long. I also worked at Robson Cycles, Bicycles Plus and Boulevard Bikes/West Point, all in the city of Vancouver.
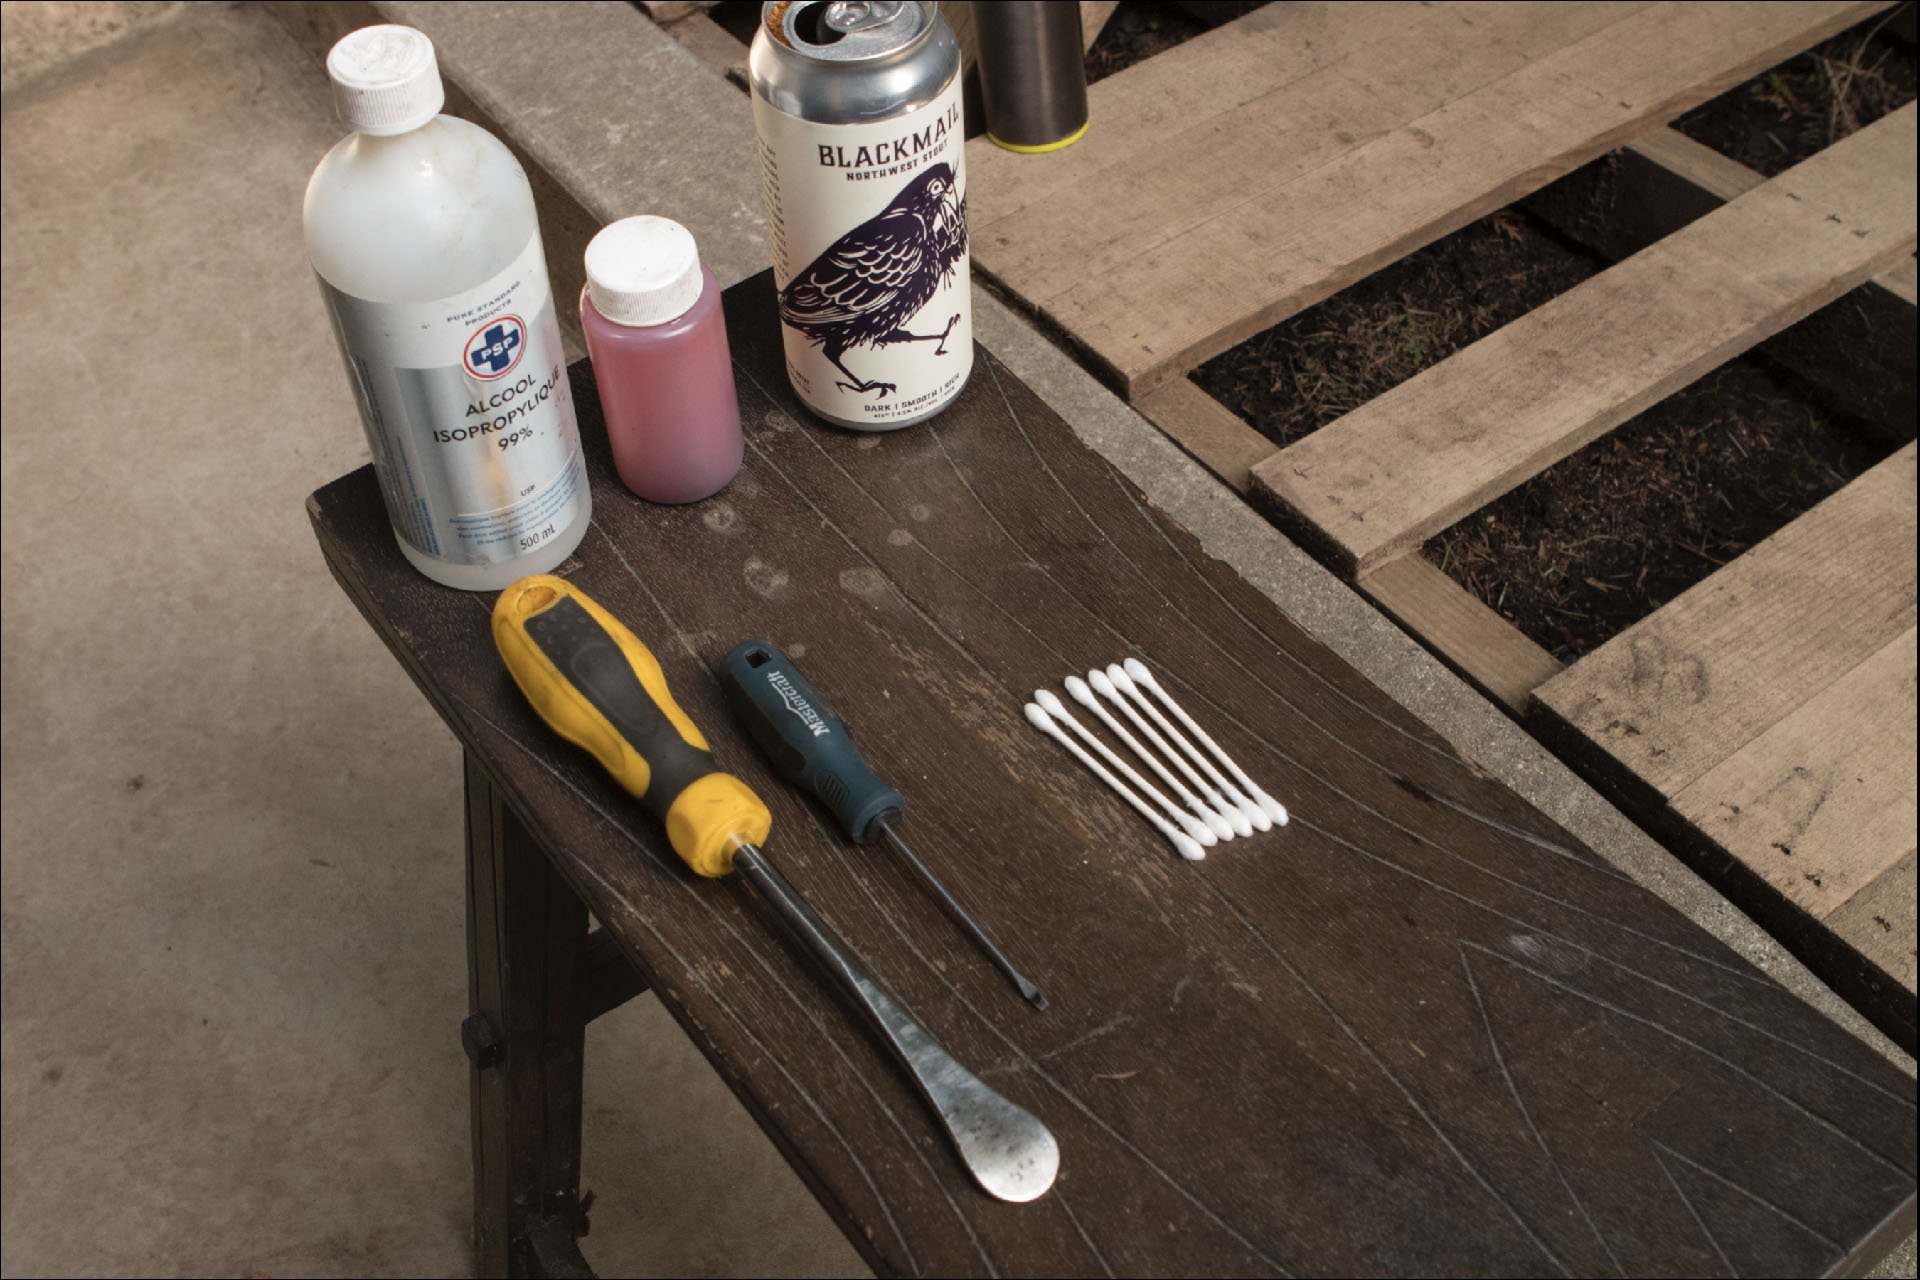
Some rubbing alcohol, a handful of Q-Tips, a slot/flathead screwdriver (for most Shimano brake pads), some mineral oil or DOT 5.1, depending on what fluid your brake takes, and some beer. If find this task pairs well with a Strange Fellows Blackmail Stout. The yellow-handed Pedro's tool above is actually a shop tire lever, but I use it exclusively for resetting pistons and spacing brake pads.
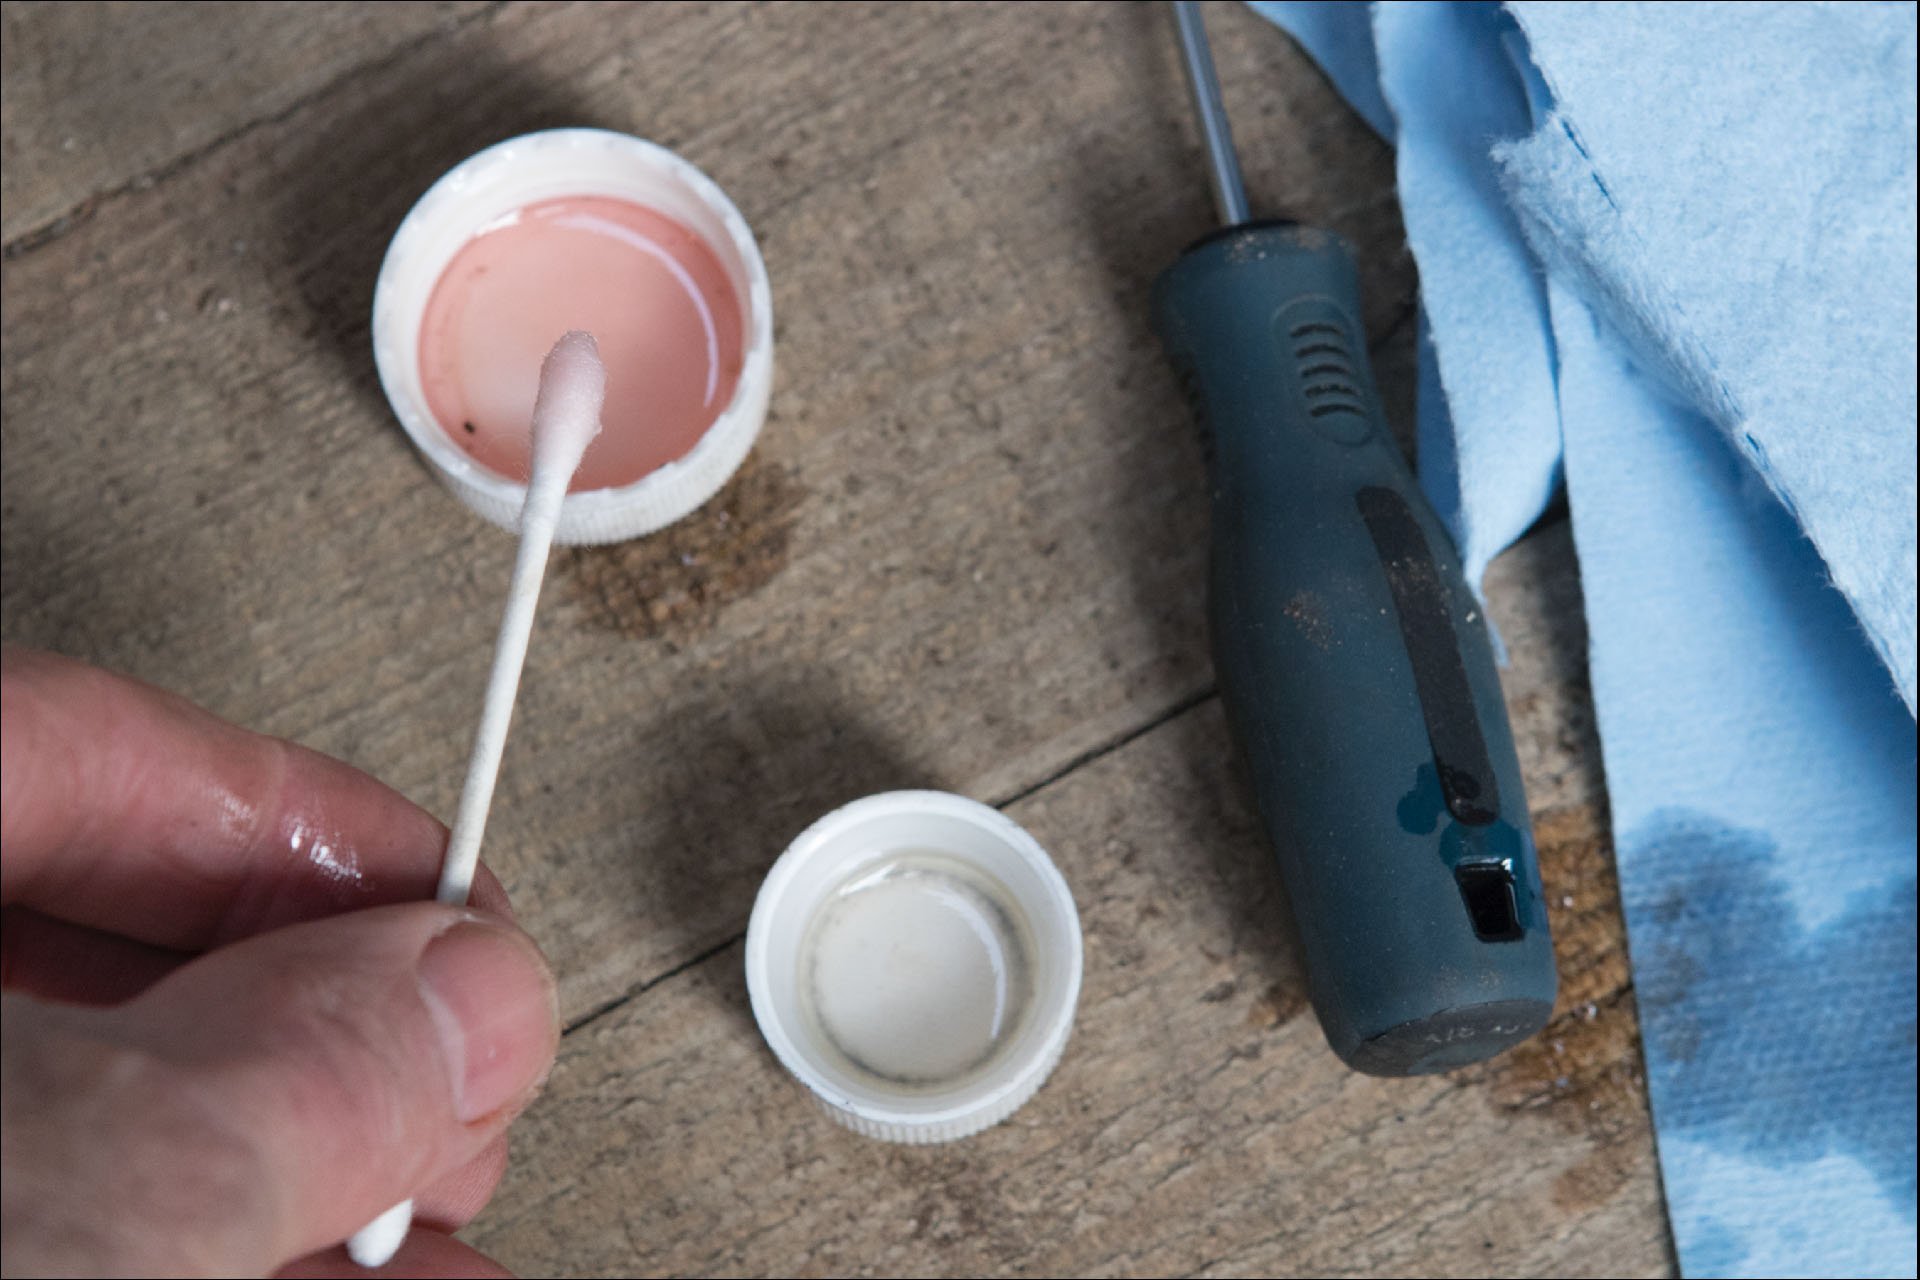
I pour a little isopropyl alcohol into the cap of the bottle for easy access and do the same for whatever brake fluid the brakes at hand require, in this case mineral oil.
So while I have decent skills with wheels and tires and bearings and drivetrains, I'm not wizard at, for example bleeding brakes. I enjoy the process so much that I usually bleed each end at least twice. My approach to French 100 was similarly repetitive. So I'm not coming to you as an expert as much as someone who likes working on bikes and writing about working on bikes. While I'm probably under-qualified to lead you through this task, I have faith in your ability to recognize my errors and point them out in the comments to help out those who may miss them.
These aging XTR dual-piston brakes belong to my wife. She was pleased to see me working on her bike in the middle of my work day, and I failed to disabuse her of that notion by telling her I was working on an article.
Her front caliper was in need of a bleed and this seemed like a perfect opportunity.
I'm slightly embarrassed to say that this particular maintenance procedure is one I'd never even attempted pre-COVID. Who knew cleaning brake pistons was such a satisfying and effective task? Shockingly, I didn't even realize how the piston and seal interfaced until I did a little more research today.
Now that I've read the disclaimer, let's dig in.
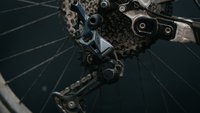
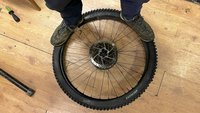
Brakes get all sorts of dirty. And then they get really hot and bake on all that sludge. Fortunately, cleaning your pistons isn't much more difficult than changing your brake pads, which also happens to be the best time to pull out the Q-Tips. I'll lay it out below with several dozen photos of brake calipers, some with pads, and others without.
How Disc Brake Pistons Work
I always assumed that brake pistons slide through their seals and retracted thanks to negative pressure in the hydraulic system. It turns out only part of that is partly true. The seals, which are square rings rather than o-rings, actually flex and move with the piston. This nifty design allows the pistons to gradually self-adjust as the pads wear, at least in a perfect world. The seals also act as a supplemental return spring so your brakes reset more positively and quickly. Which means theoretically we don't clean pistons to make them move more freely, we do it to prevent contaminants from entering the system and I suppose to extend the life of the seals.
In my experience however, the action of my brakes always feels noticeably lighter and more positive after a good clean. Without these results I wouldn't be so keen the task. It's wise to do this every time you replace your brake pads because by the time they are worn out they will have pushed more deeply out of the seals since you'll need to make room for the thickness of the new pads. Doing this will push those contaminants into your brake system.
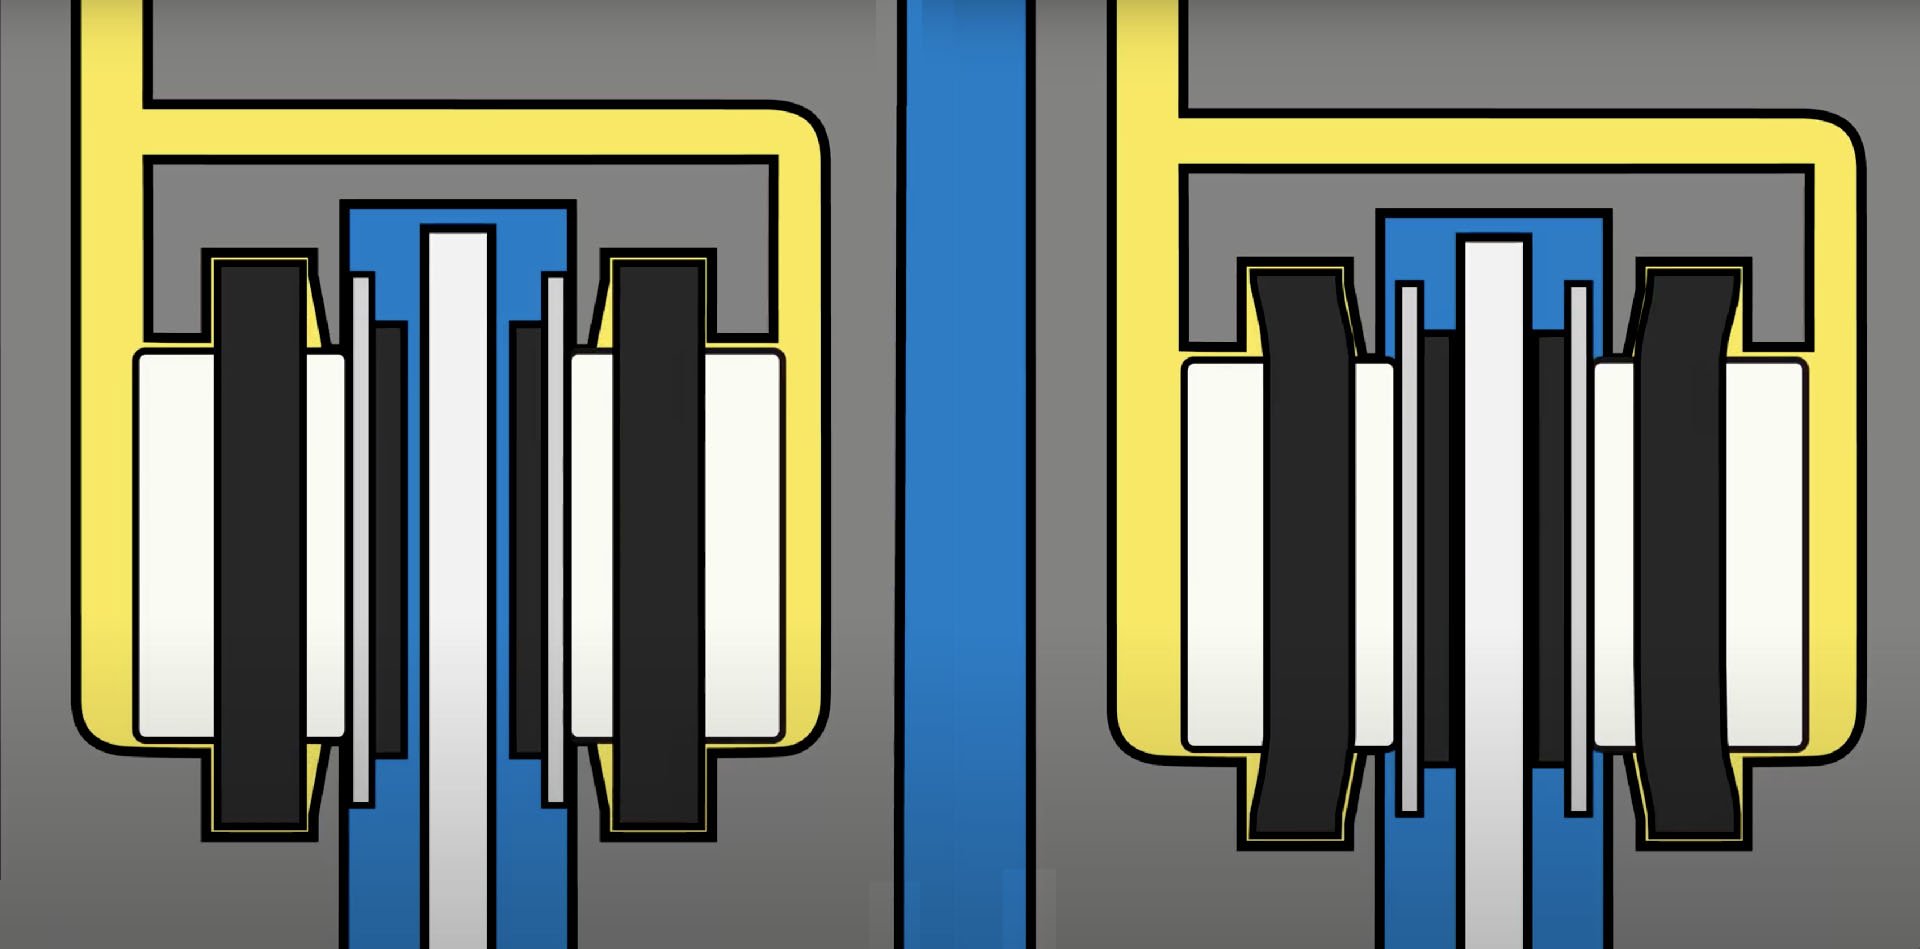
This graphic from Park Tool shows what happens when you depress your brake lever. Pistons are shown in white and the wide black bands are the seals. The left image shows the brakes idle while the right image shows the seal, in its recessed gland, flexing as pressure is applied to the piston and then to the rotor.
Step 1 - Remove Pads (two-piston caliper)
If you can't remove your brake pads, you probably need a better instructor, but let me tell you it's pretty easy. Sort that out before attempting this maneuver, walk before you swim and all that.
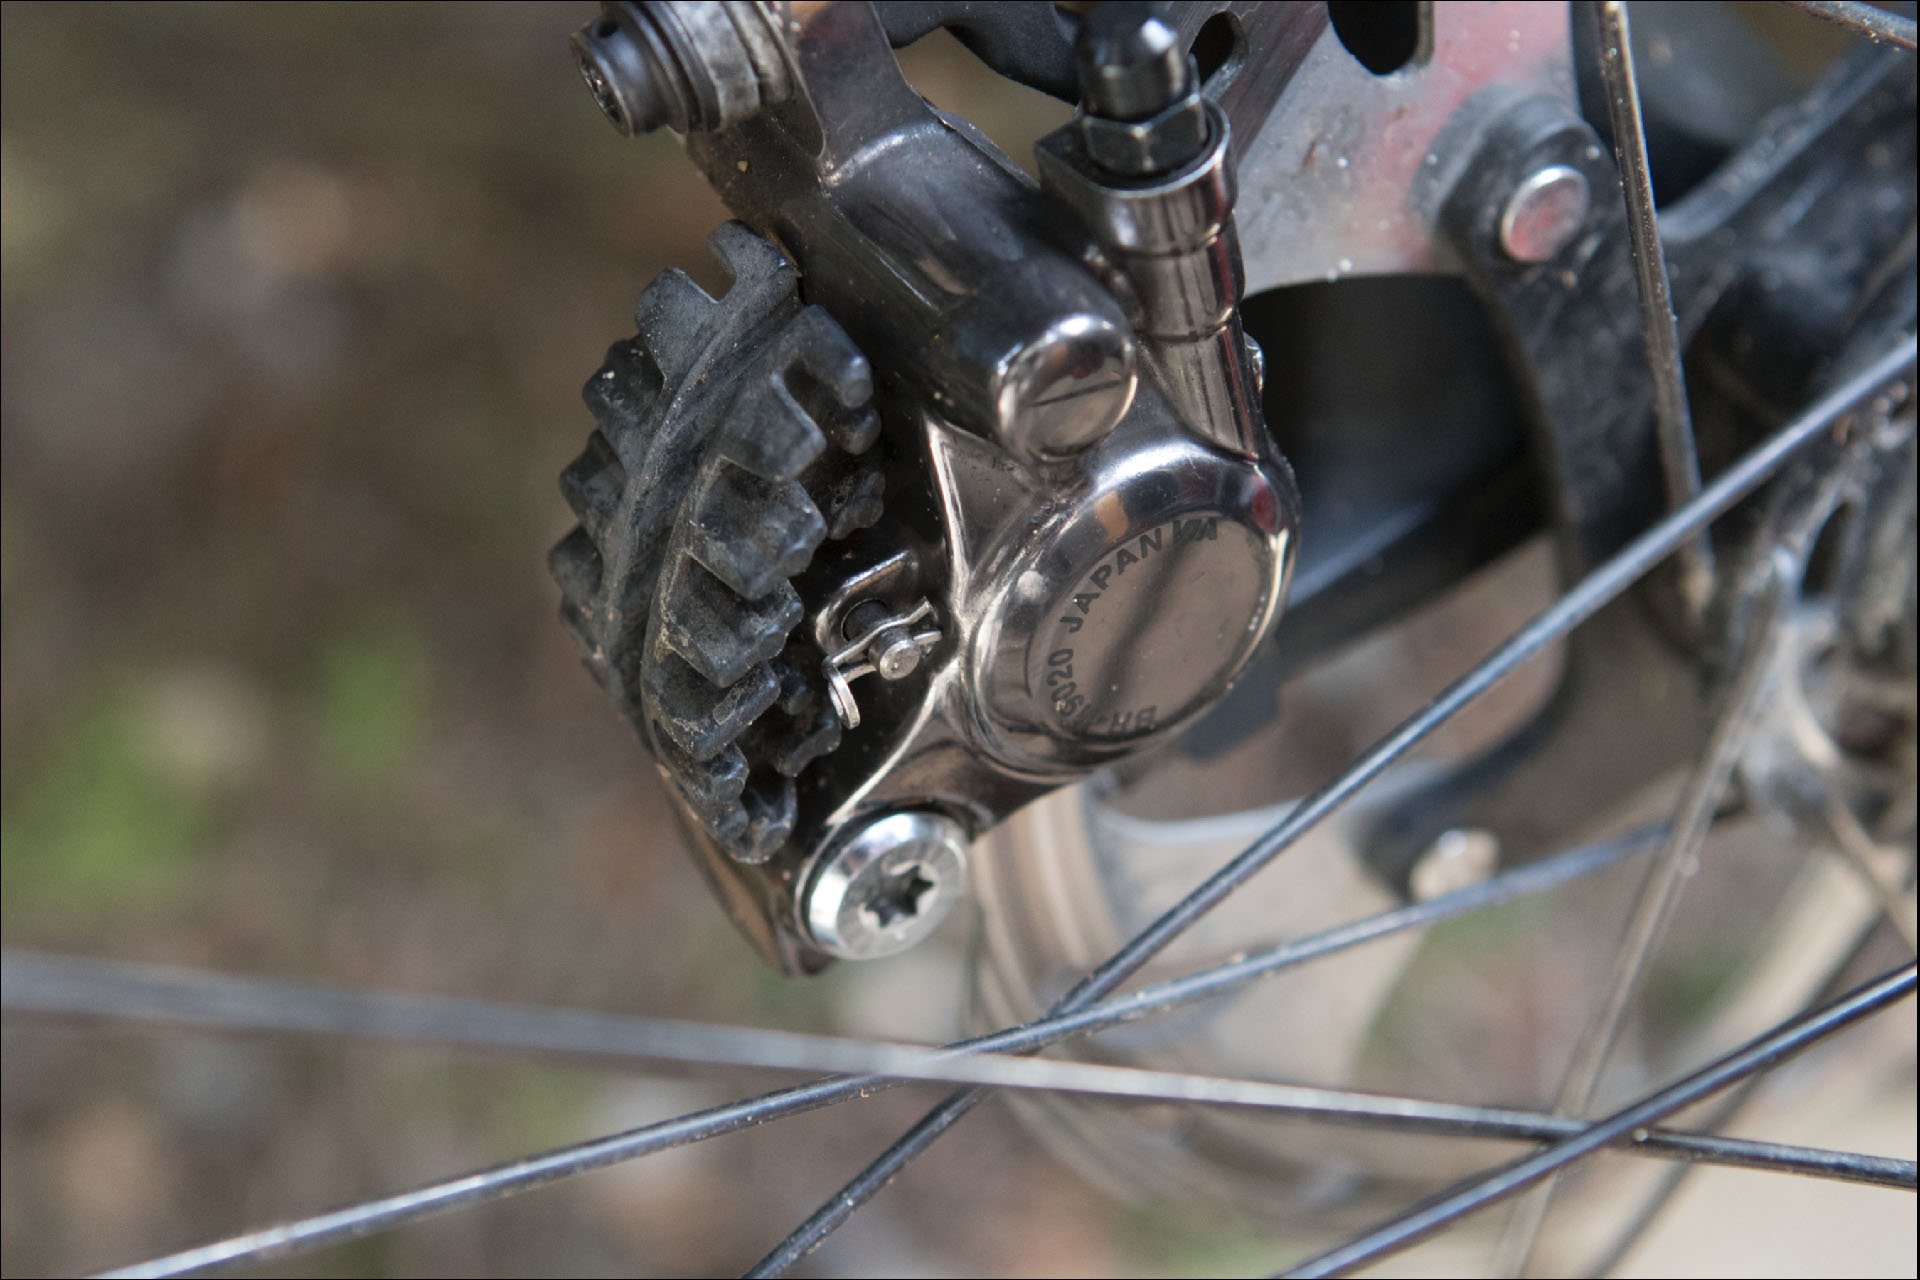
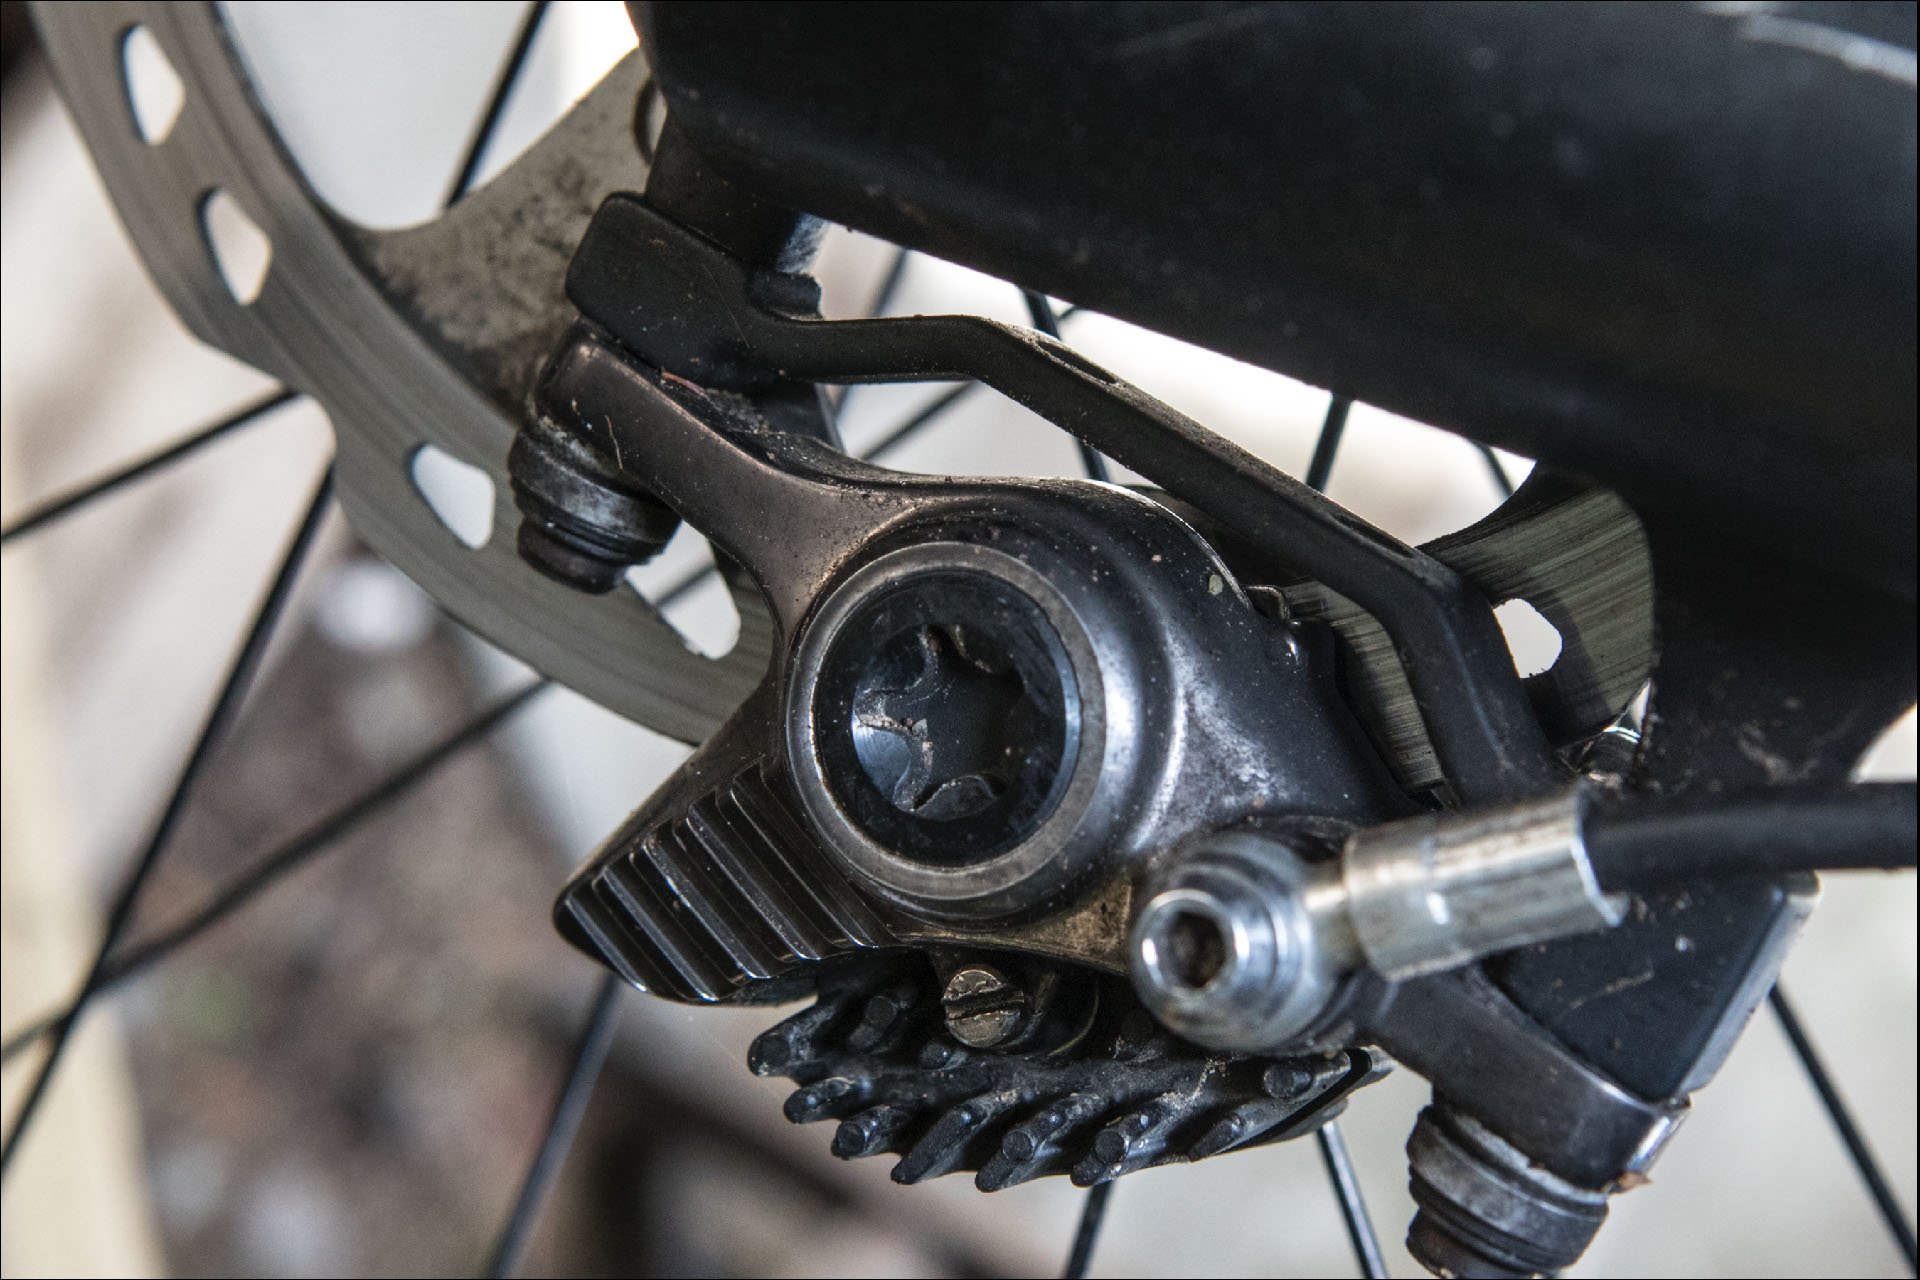
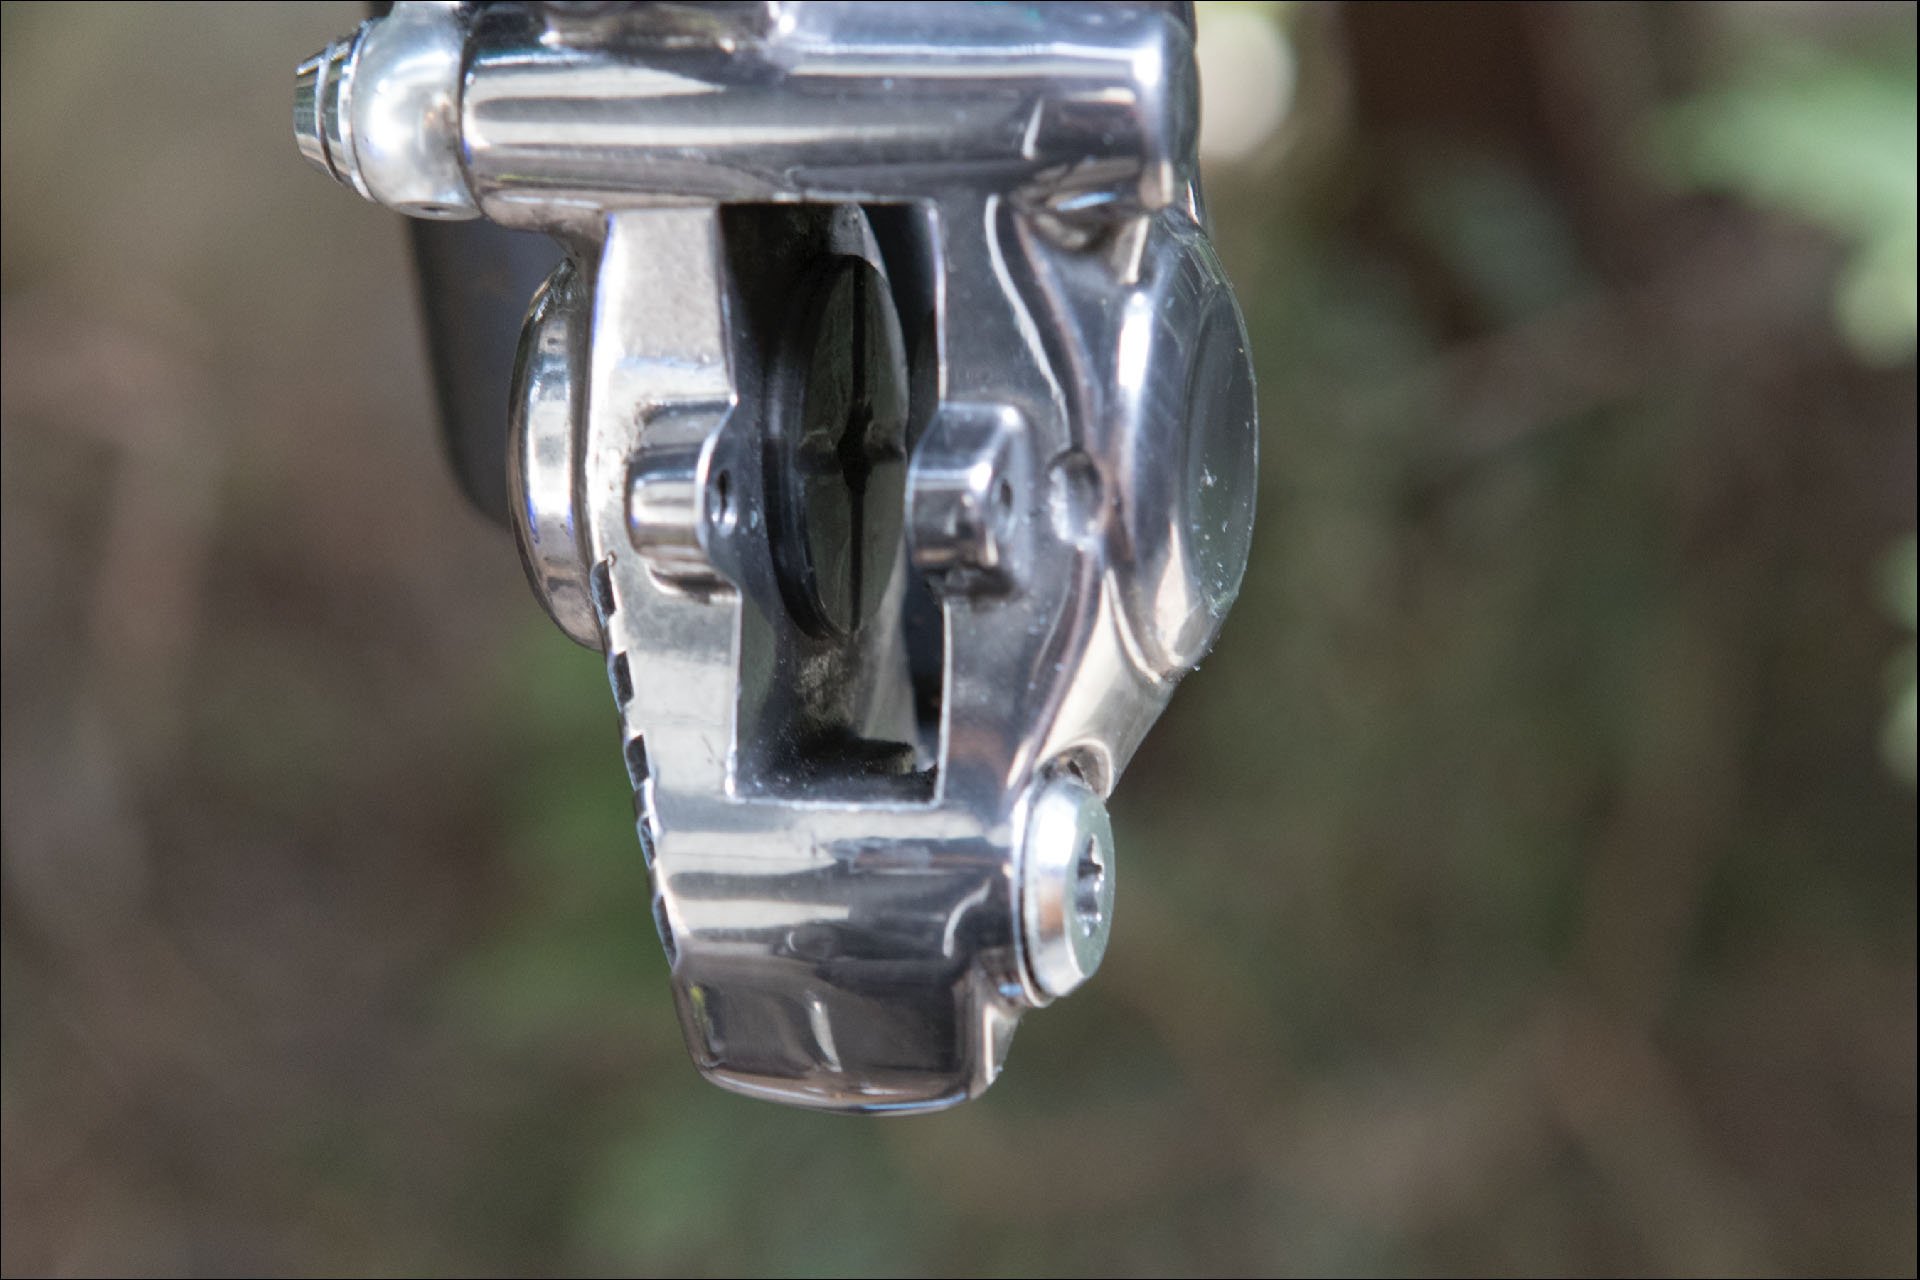
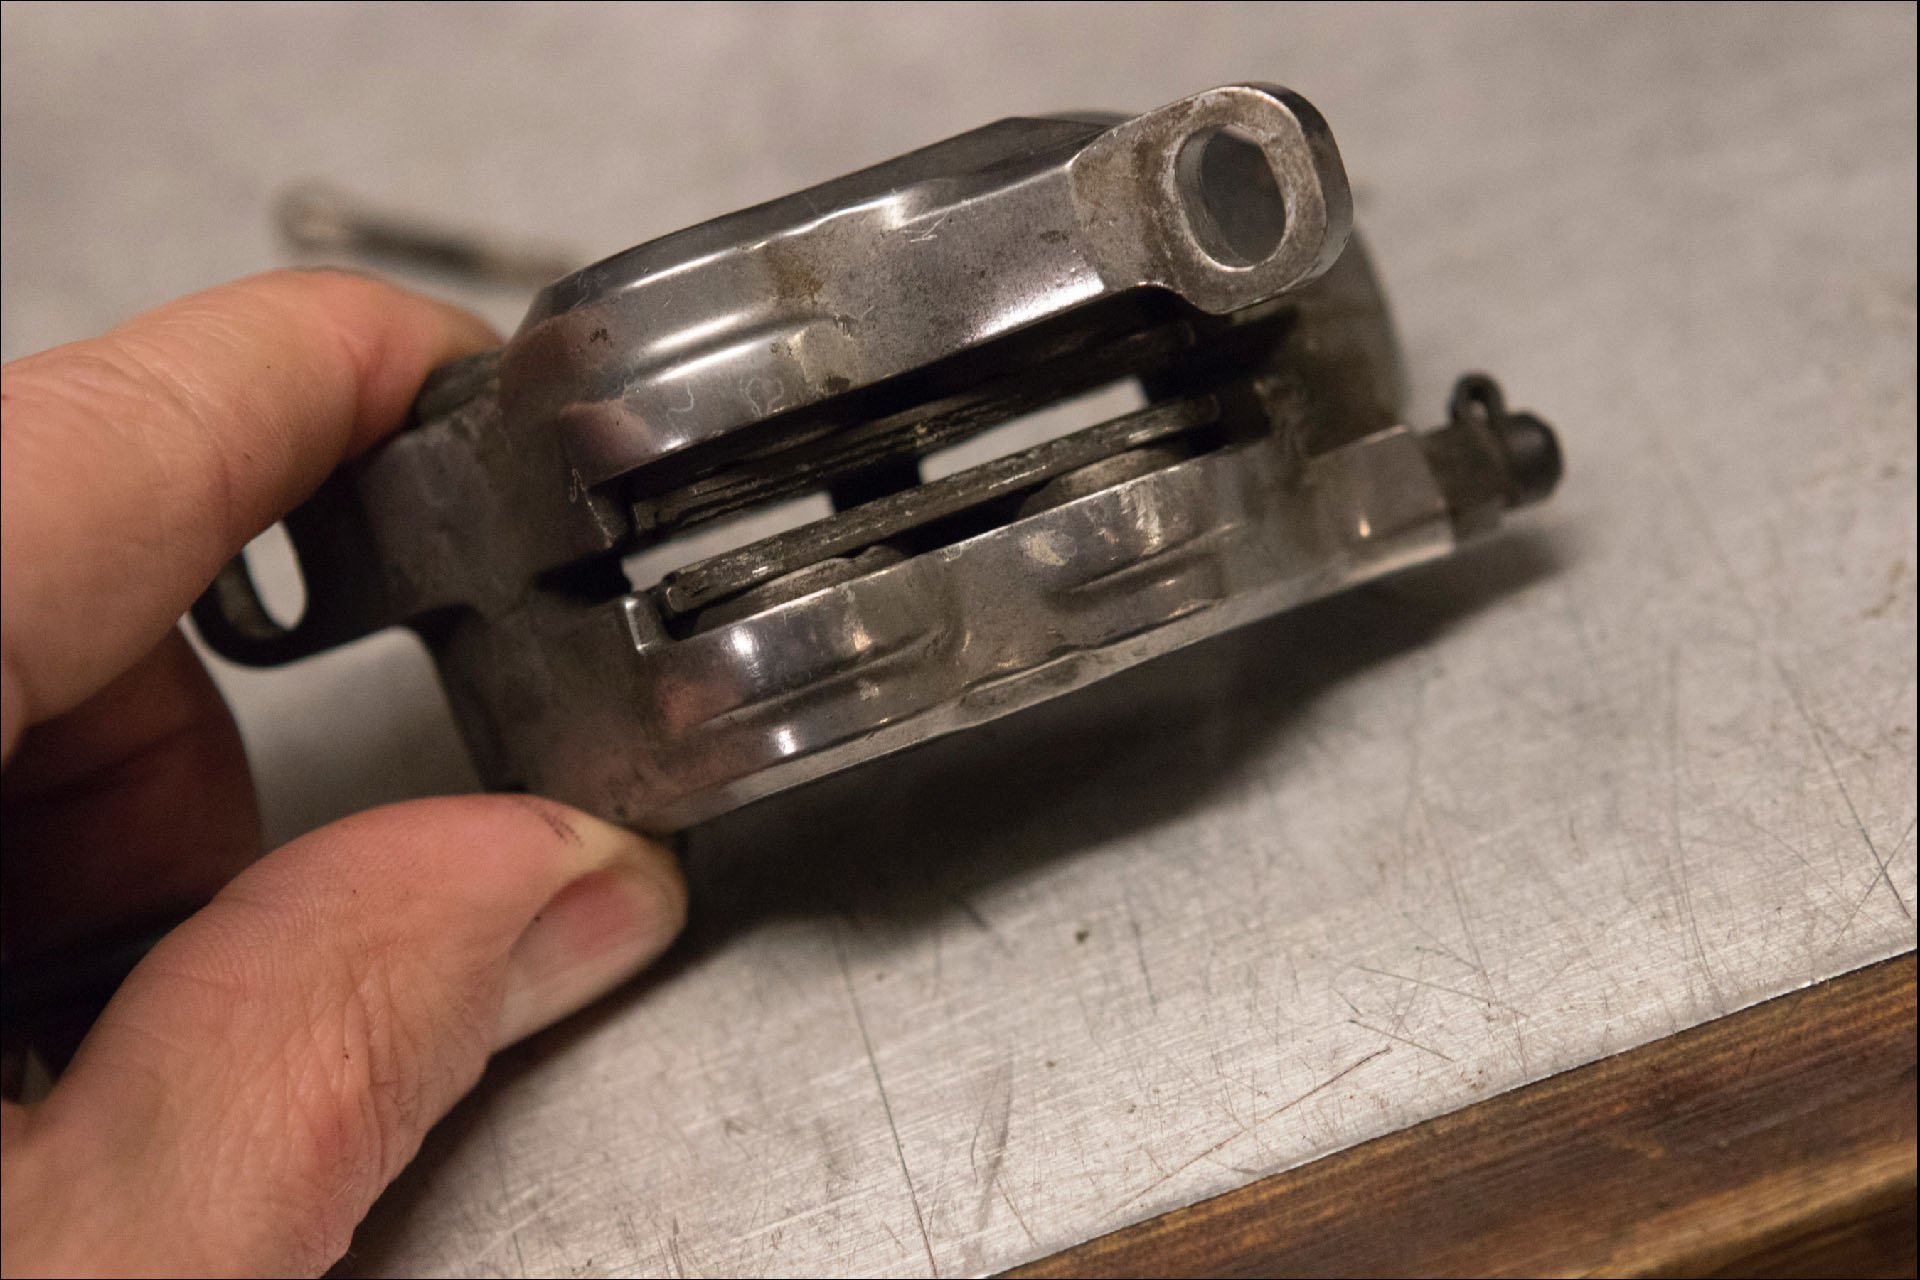
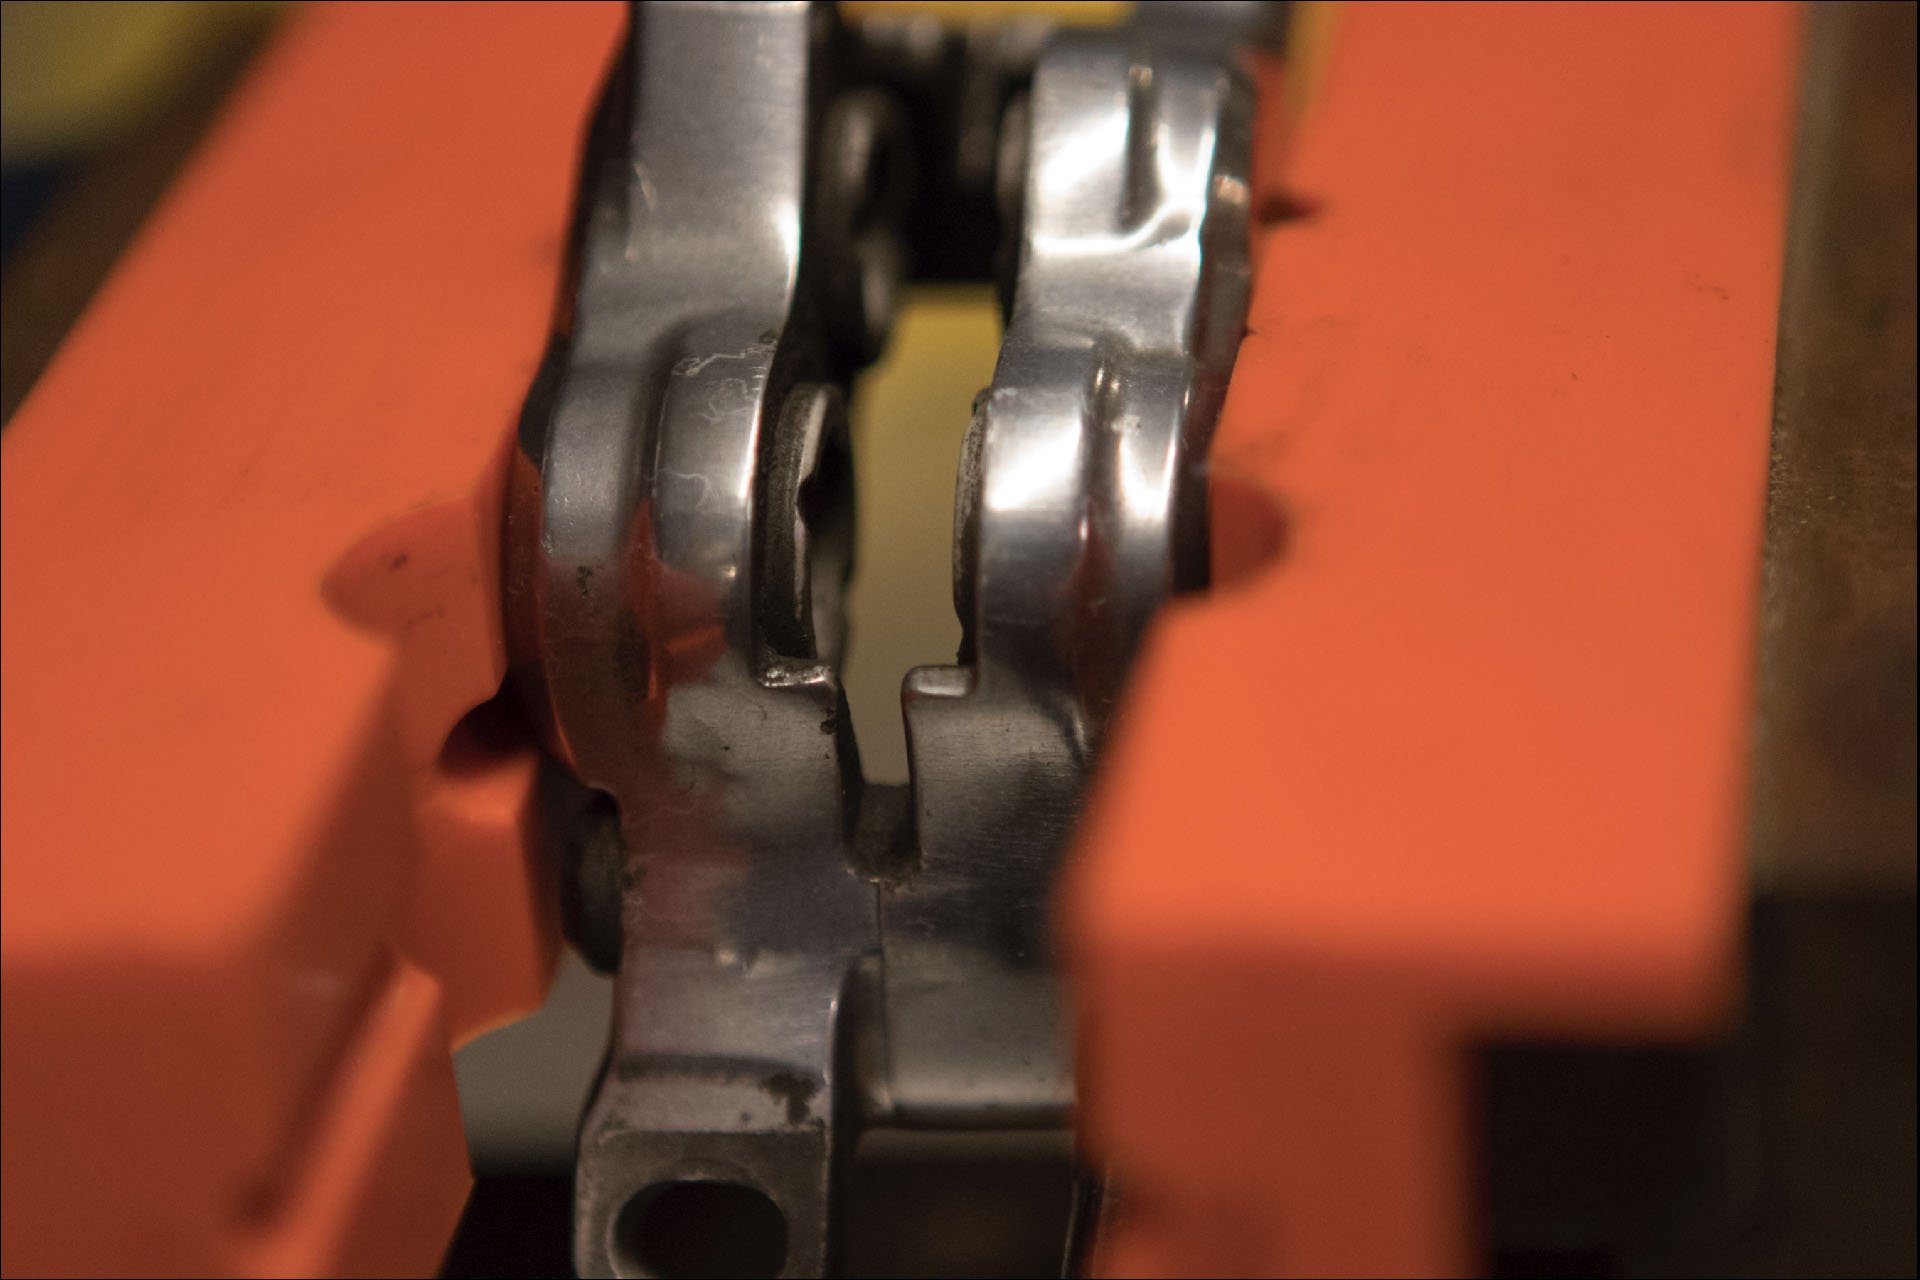
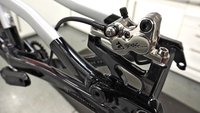
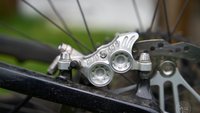
We're dealing with Shimano brakes here so you either have a cotter pin holding the pads in, or a 3mm hex head bolt with a safety clip on the other end. After the clip and bolt are removed, simply lift the pads and their keeper out from the top. At this point you'll notice the pistons, either 2 or 4, are conspicuously exposed.
Step 2 - Premilinary Scrub
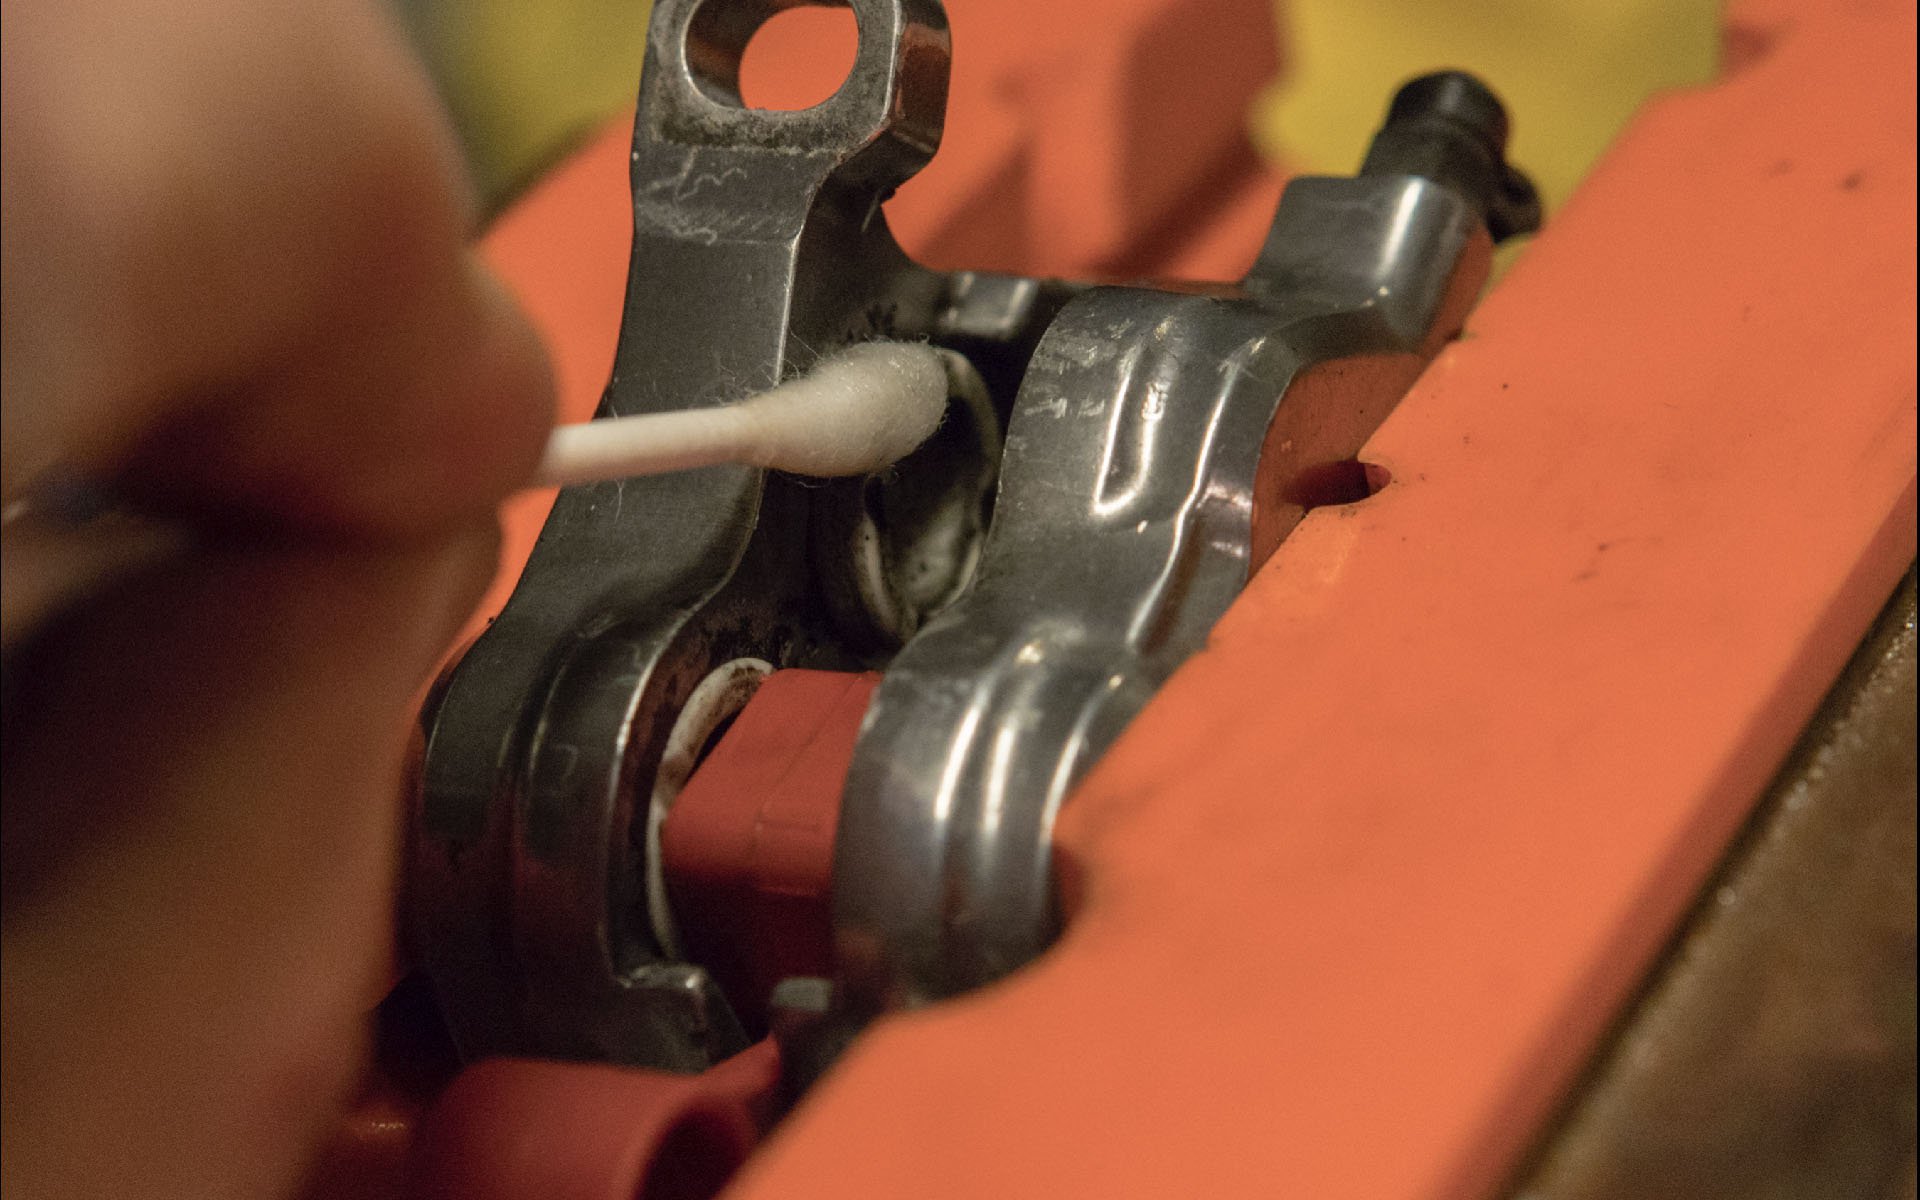
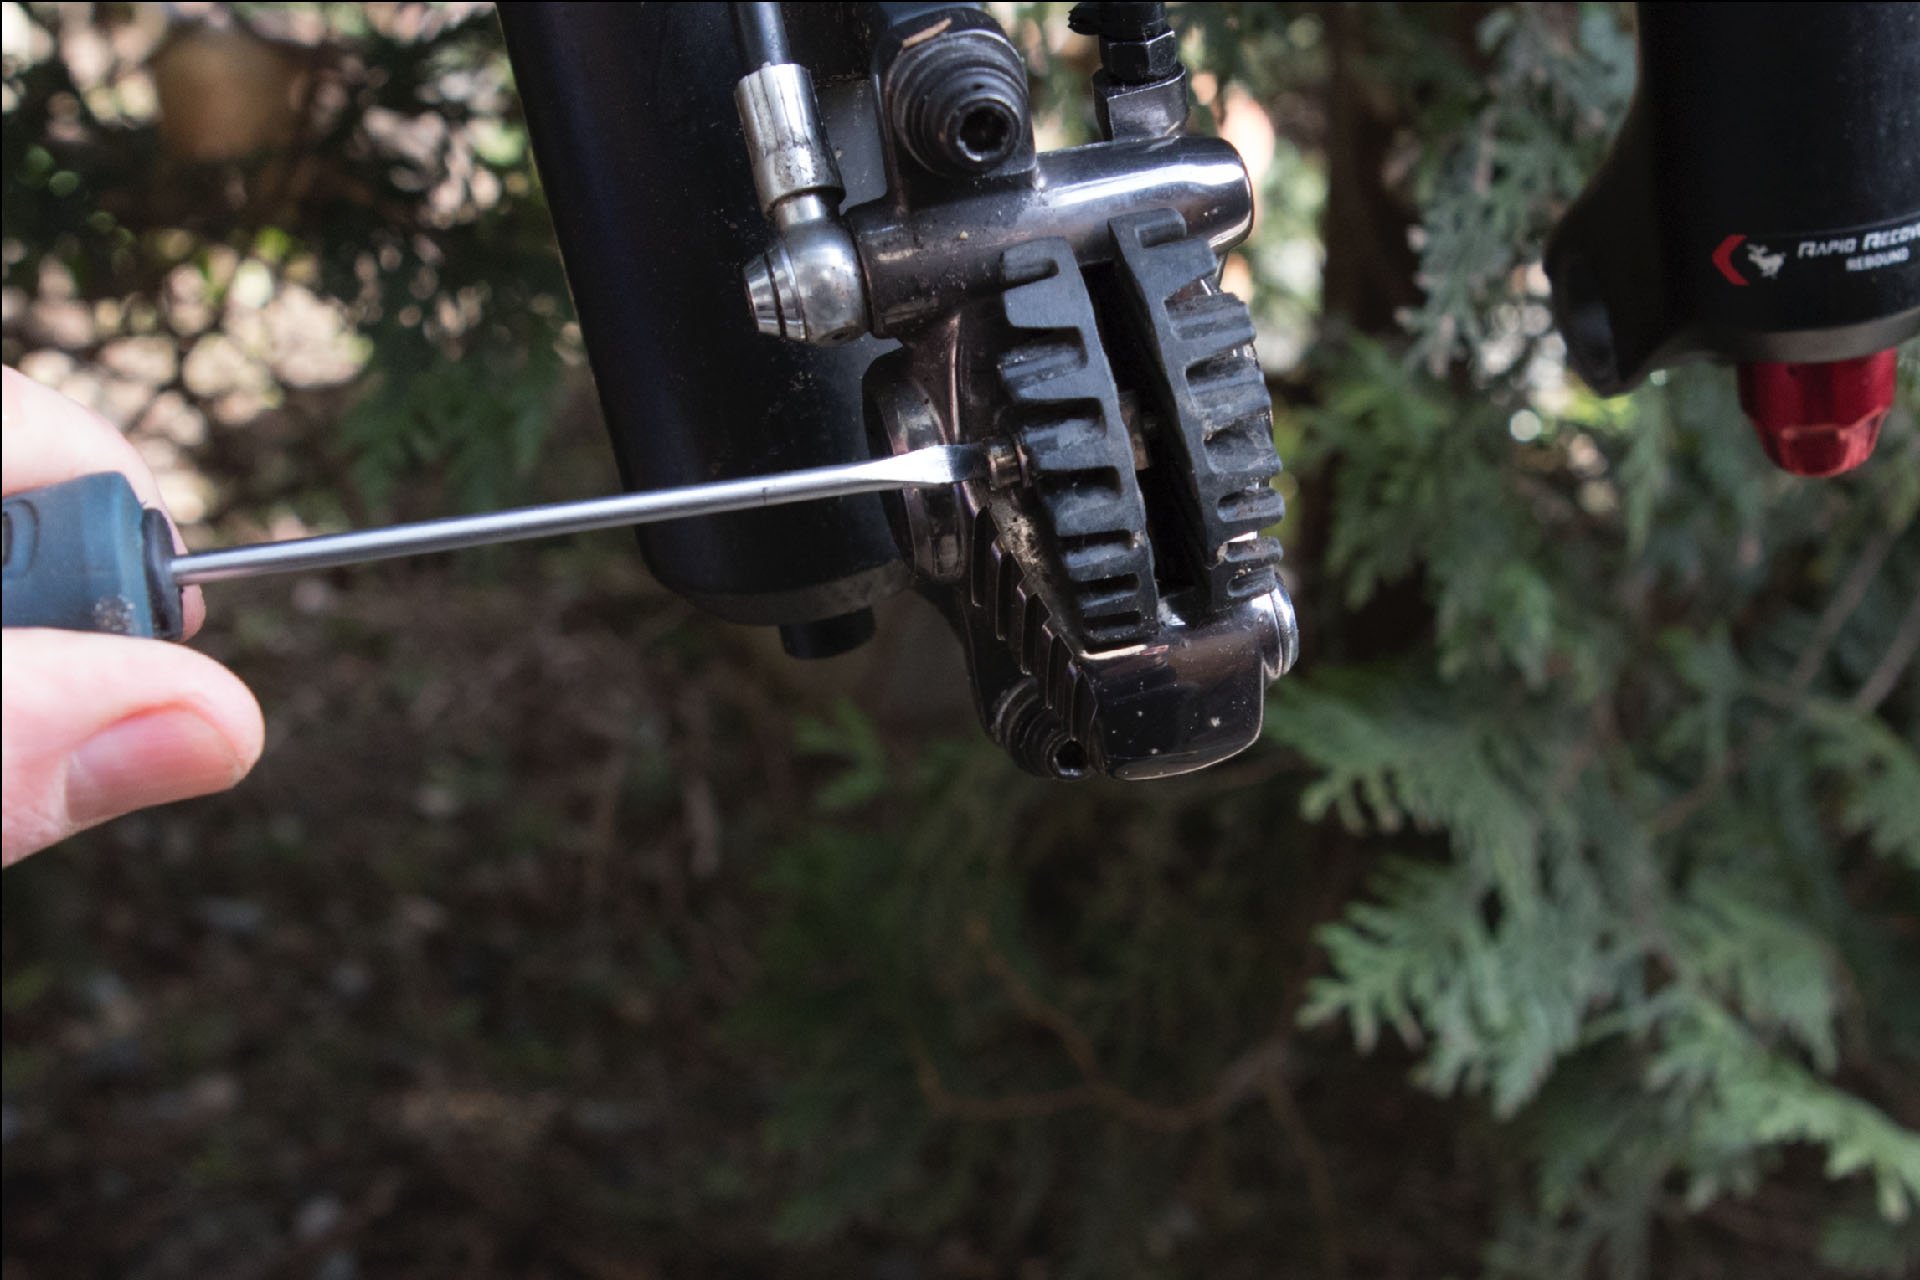
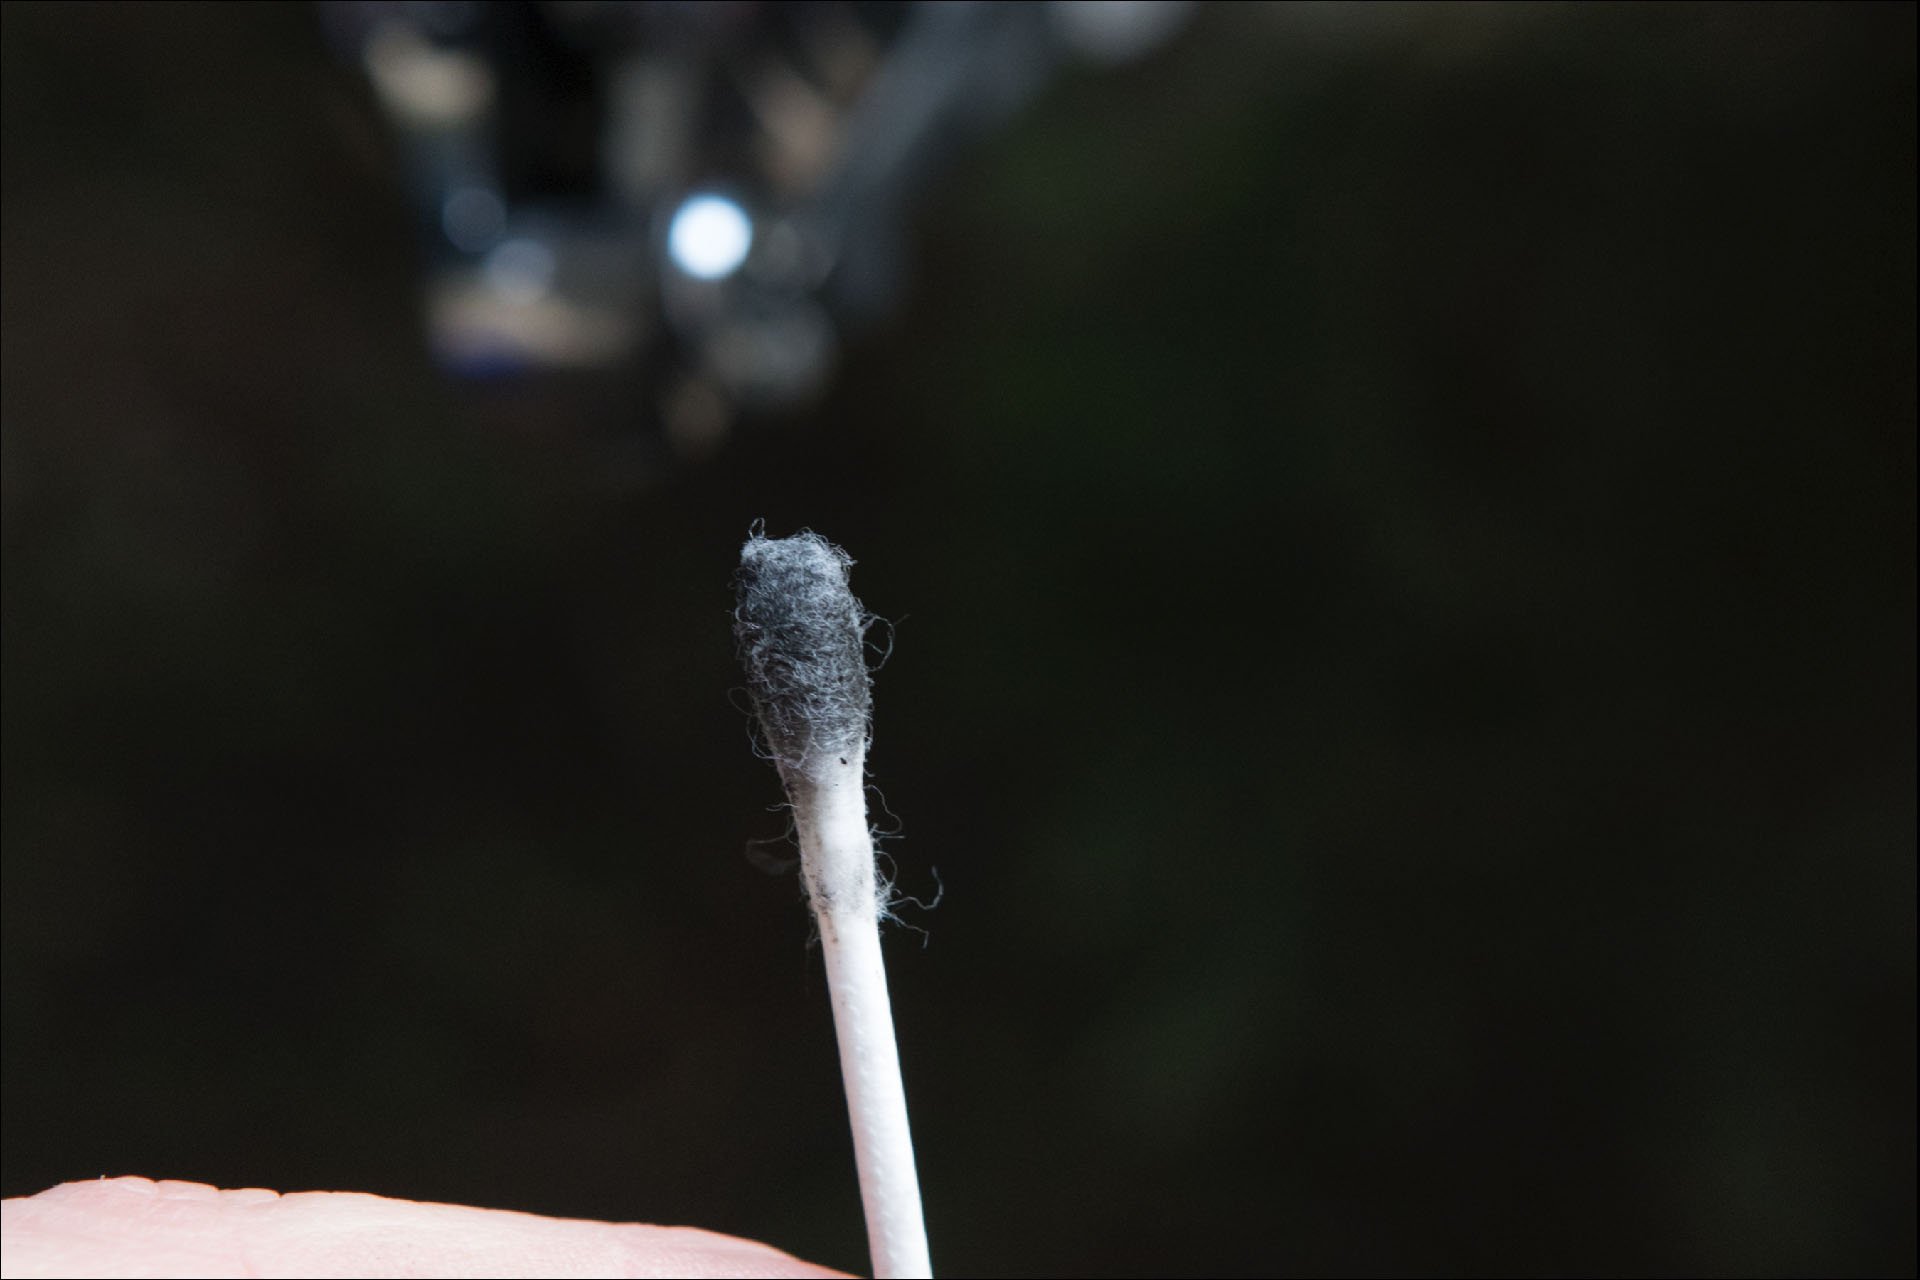
I do a preliminary clean at this point before manipulating any pistons because it's easy to push a piston in inadvertently during the next step. I put a little isopropyl in the lid of the bottl, dip in a Q-Tip, and then give the exposed portion of the piston a bit of a rim job. You'll likely remove a remarkably gratifying amount of black film from each piston.
Step 3 - Full Clean
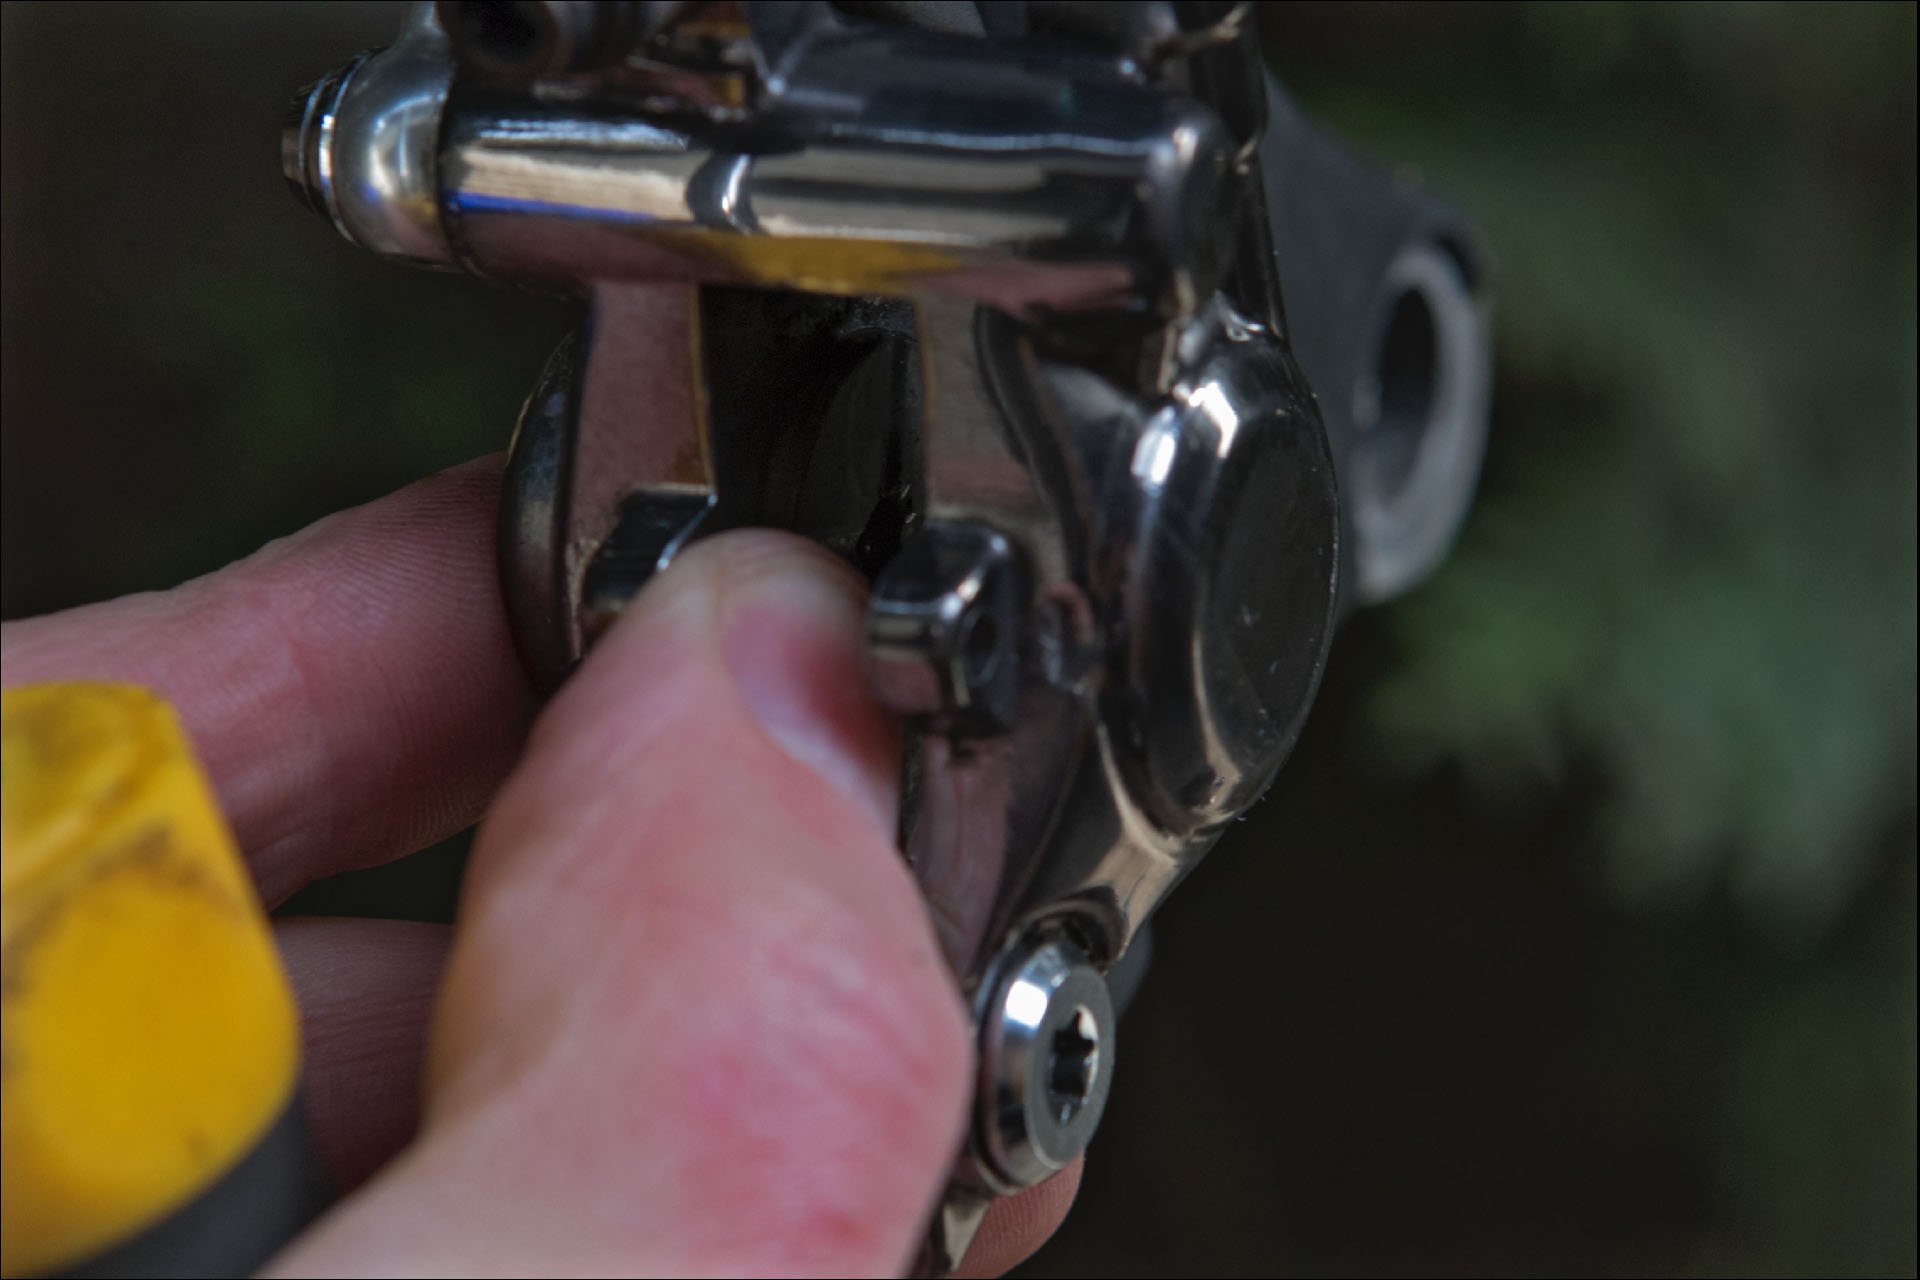
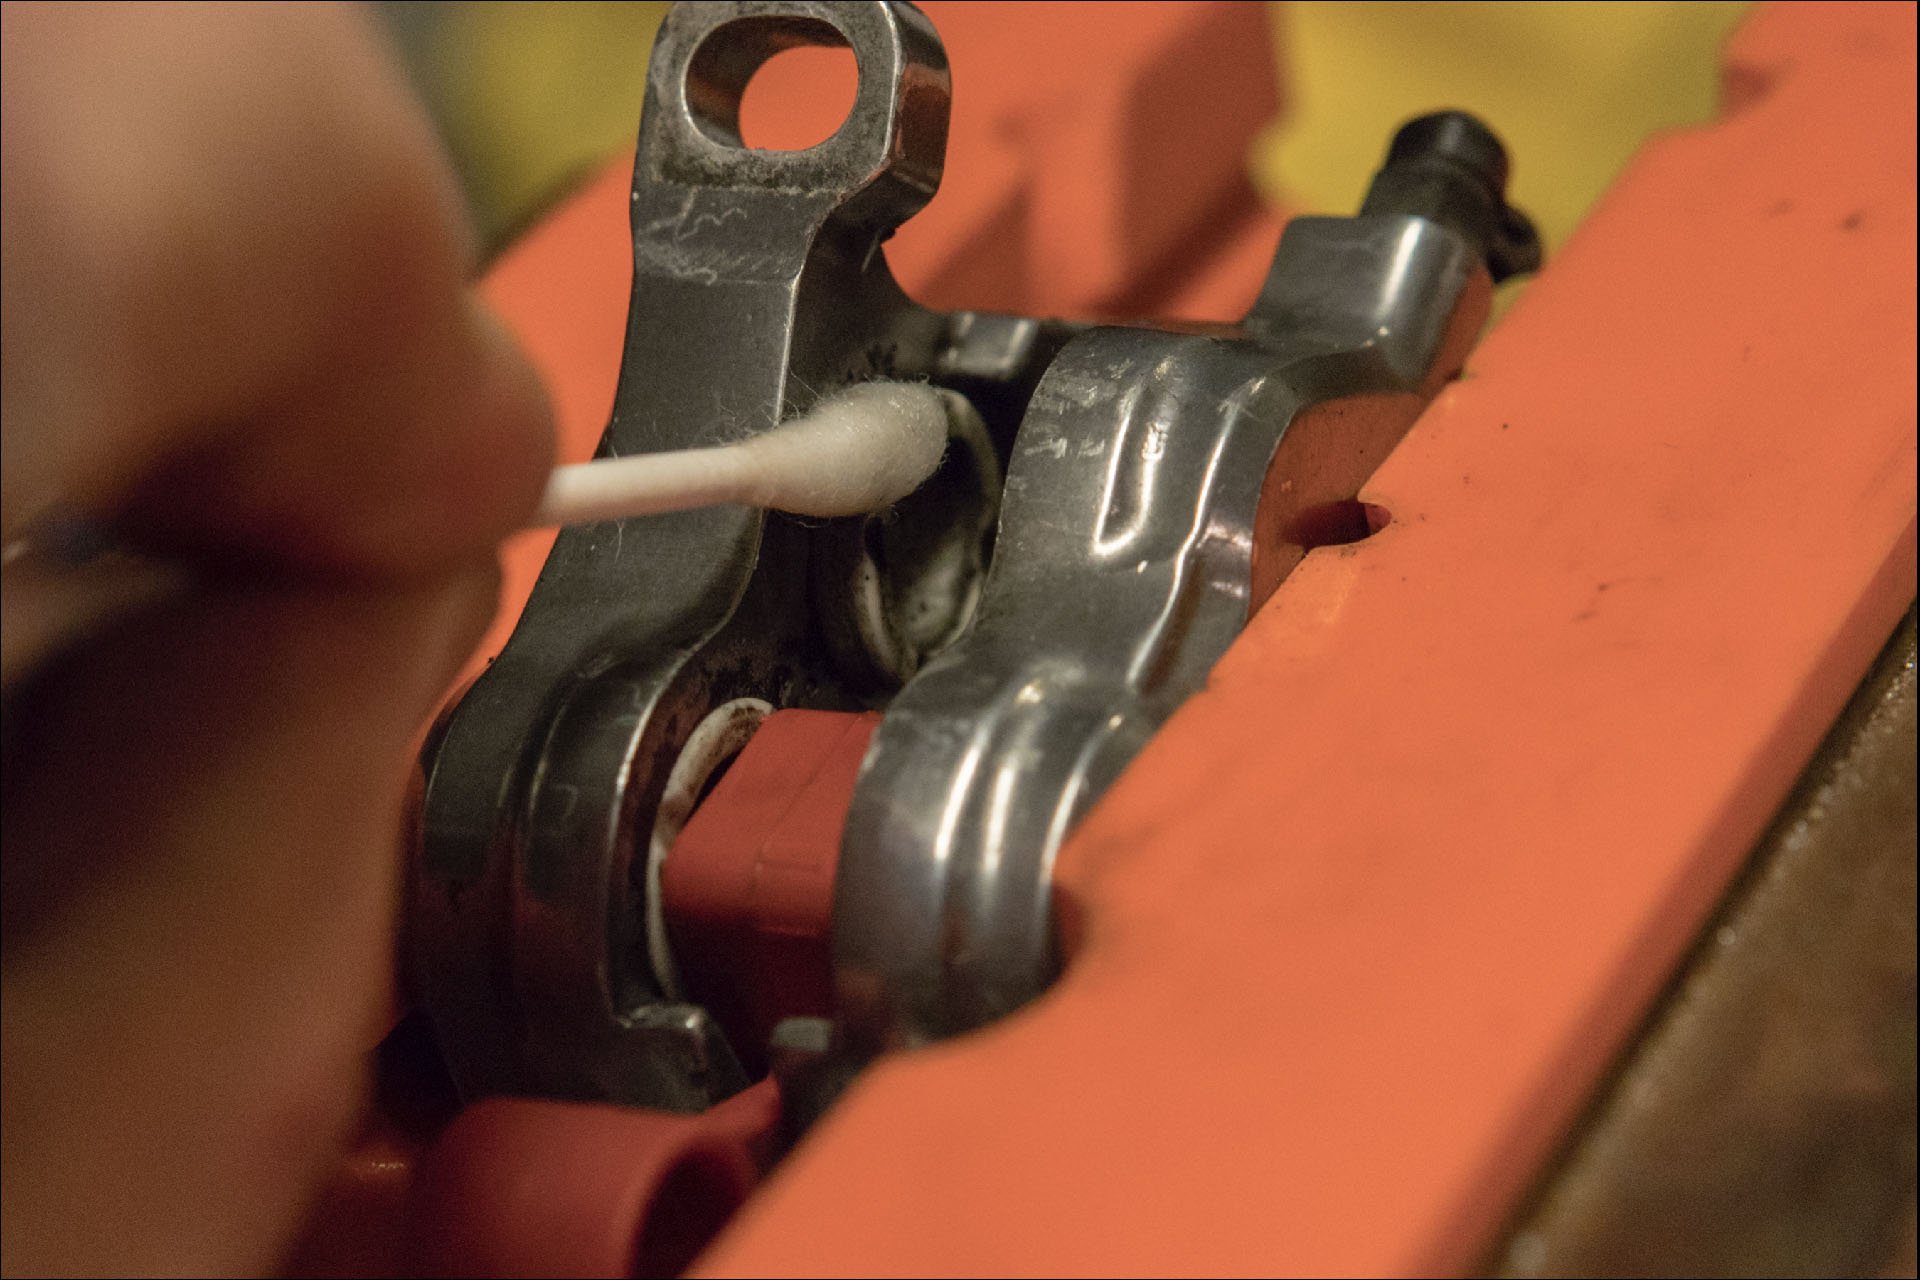
Once the first wipe is done it's time to allow the pistons to extend further for a better clean. To do this use a blunt tool* carefully, or a finger even more carefully, to prevent one piston from extending, while gently pulling the brake lever. This allows the other piston to push out further than normal exposing even more glorious black contamination. Be careful not to push the piston out of the seal, because at best you're going to have to re-do the bleed and at worst you'll create a large mess. Once you are there, use your Q-Tip and alcohol again, remembering to have a swig of beer at regular intervals. After quenching and cleaning, I dip the Q-Tip in a little Mineral Oil (for Shimano or Magura) or Dot 5.1 (for SRAM or Hayes), and coat the exposed portion of the piston. A quick clean with a shop towel here to make sure no fluid will contaminate your fresh pads is a good precaution. Reverse the process and repeat this step for the other piston(s).
*I use a Pedros long tire lever or a nylon tire lever for this step
Almost as satisfying as scooping some caramel-coloured goop out of your ear.
Step 4 - Reset
Reset the pistons by gently pushing them back into the caliber body until they sit flush. Again I use my Pedro's tool for this, slowly and gently alternating between the two so as not to apply too much force, but you could temporarily install a set of old brake pads to protect the pistons while levering them apart with a screwdriver. Wiping the cavity with alcohol, and taking another swig, are both worthy strategies at this juncture.
Step 5 - Install New Pads or re-install Existing
Just drop them in and ensure the pistons are fully retracted, if you are putting in fresh pads. Otherwise there won't be room for your rotor or at best you'll get some rotor rub once your wheel is back in place.
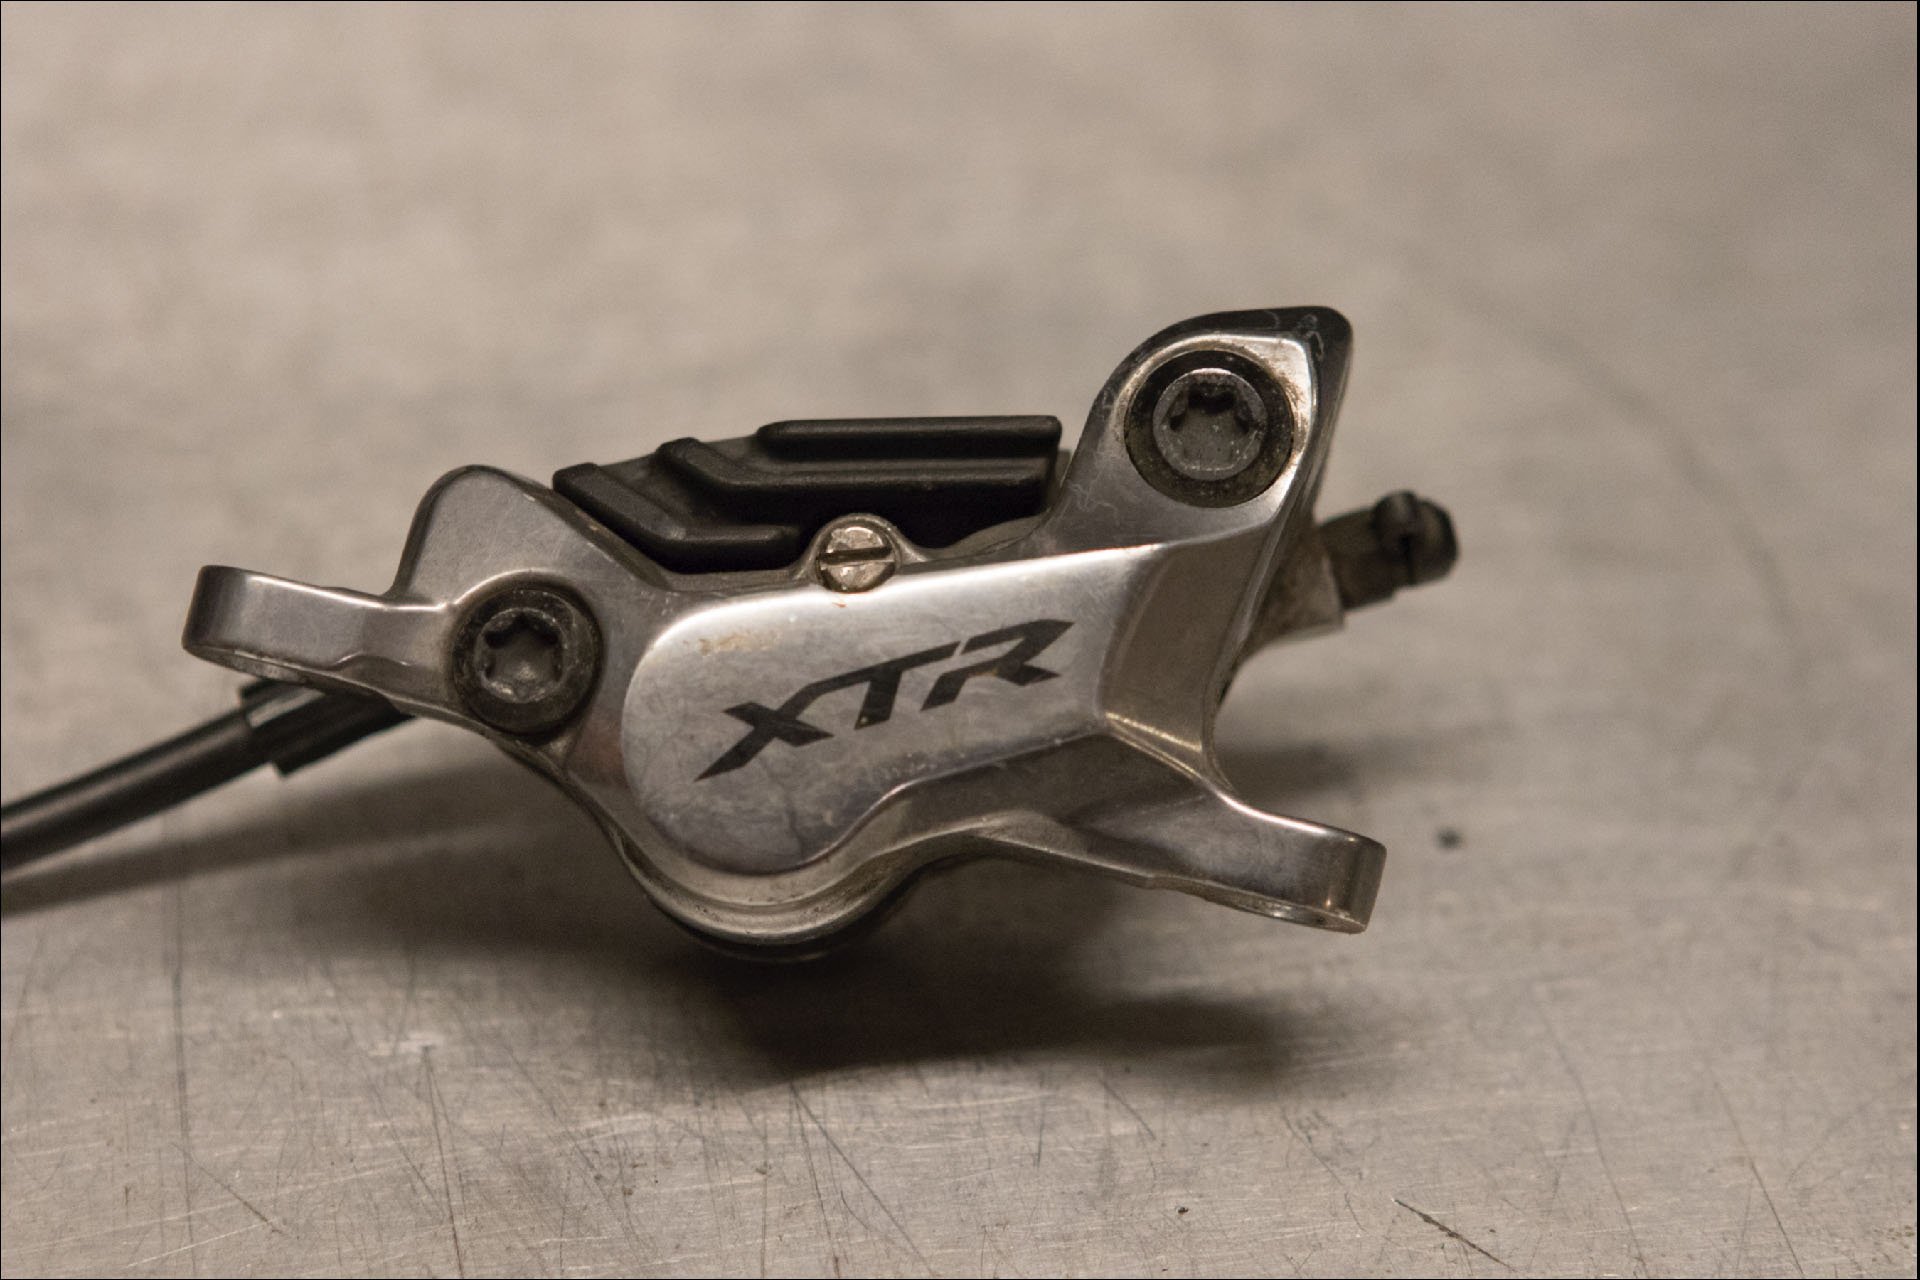
These XTR brakes have seen a lot of action and will certainly benefit from this task. Removing pads is no more challenging so we'll skip to step 2 below.
These were working fine when they were last in service but you can see that things are pretty caked up and the pads are ready to be replaced. Shimano brakes tend to work pretty well when deeply worn however, for those of you who like to squeeze every micrometer of value out of your pads.
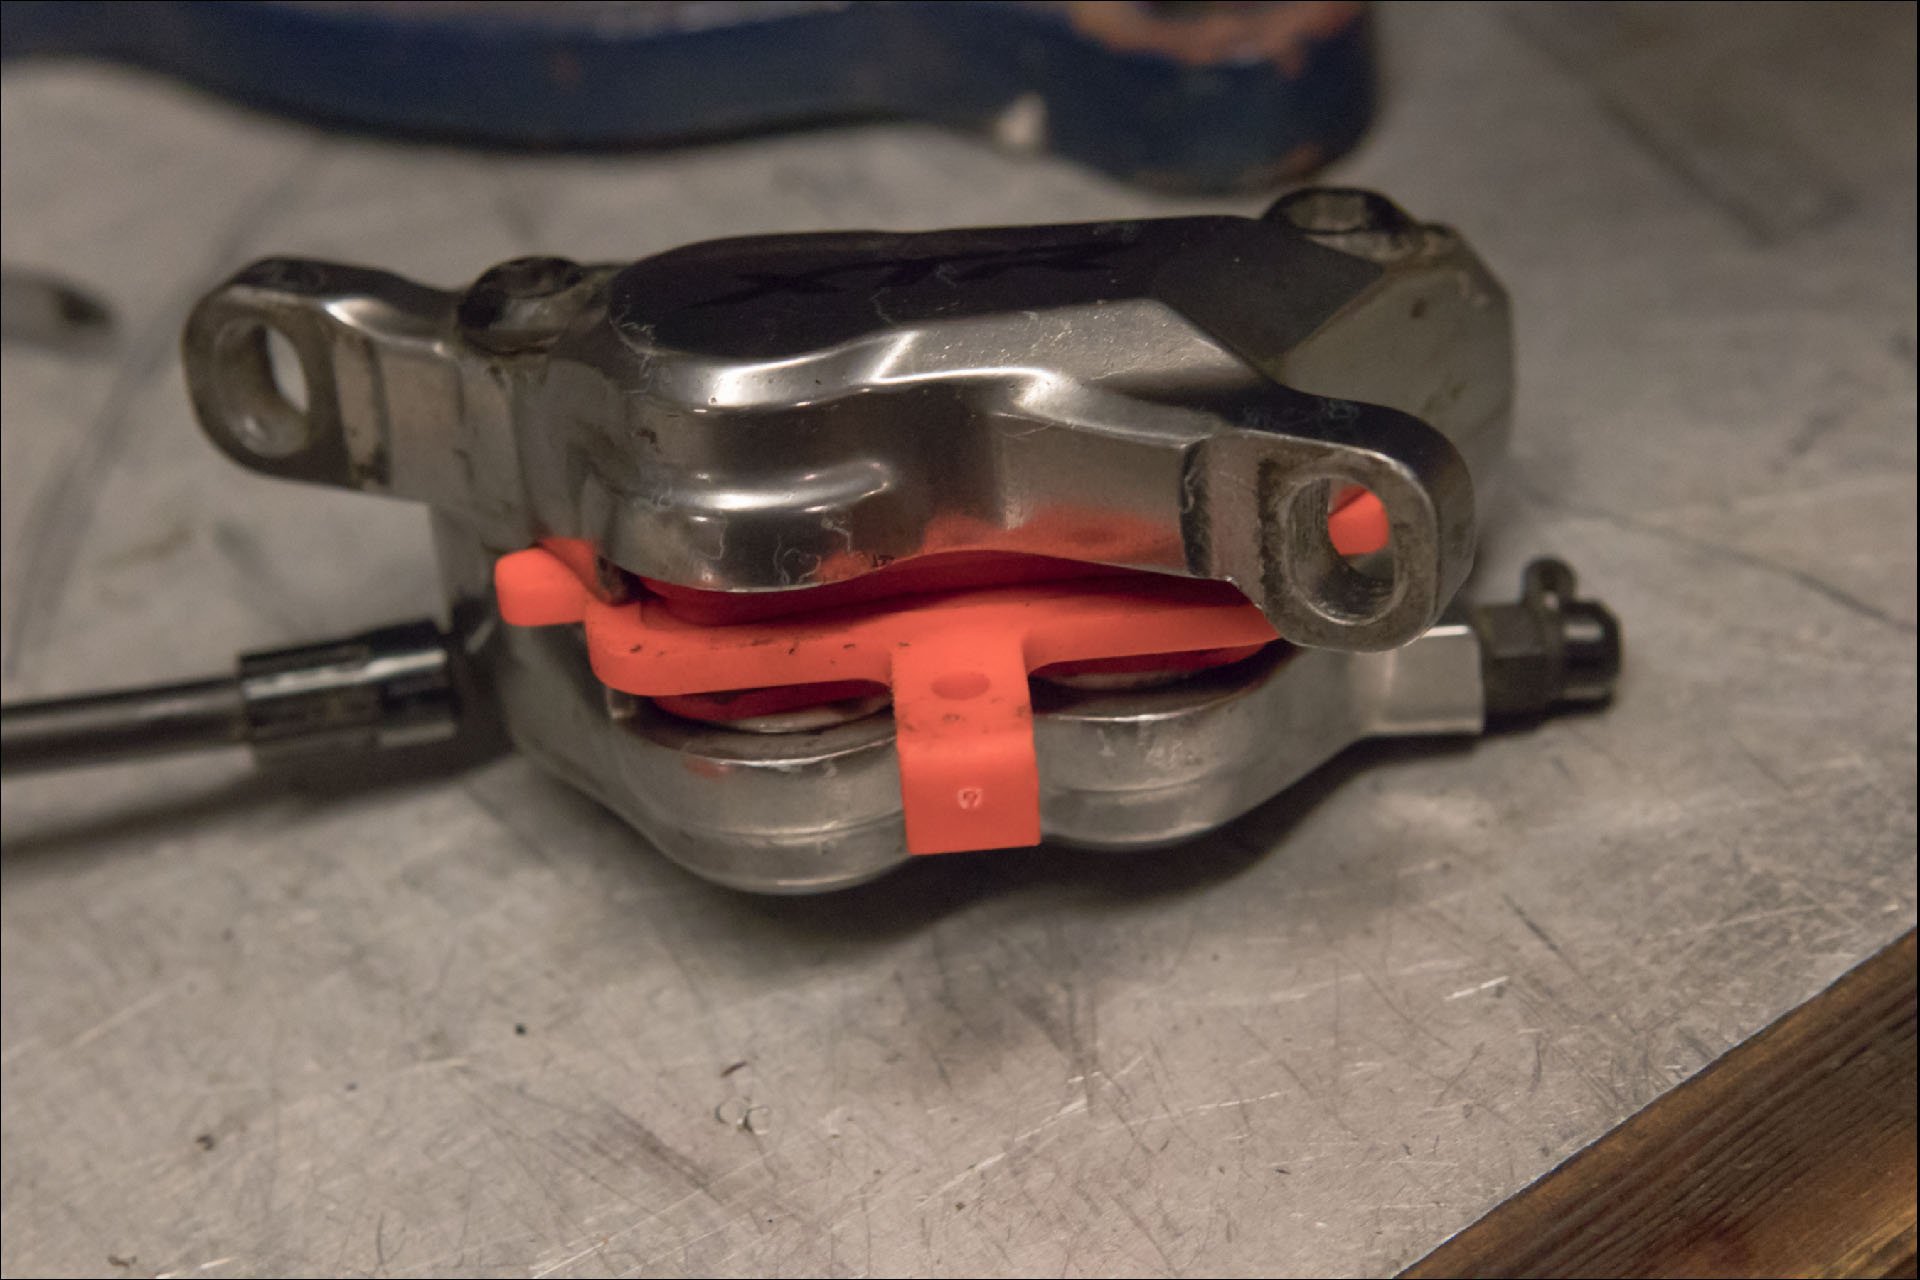
Four-Piston Calipers
It's a little trickier when you are dealing with a quad-piston brake but only marginally. Having a bleed block that spaces calipers with pads removed for a bleed is a very useful tool at this point. The steps are the same but it's much easier if you can prevent one pair of pistons from moving while you clean the other pair.
Step 2- Preliminary Clean - this step is no different with quad pistons but you'll likely find it a little tricky to get the Q-Tip between the pistons and the caliper housing on the outside edges of each piston. Just get lots of alcohol on your weapons and dig in. (note - never put your brake caliper in a vice without soft jaws and even then don't clamp too hard)

Step 3 - Full Clean. At this point you are going to want to fully retract one pair of pistons to install the bleed block. If you don't have an appropriate tool (again a nylon tire lever works well) it makes sense to reinstall your old brake pads to protect your pistons to help fully push the rotors back into their seals. Once they are retracted, install a bleed block but only between one set of pistons. Now you can block one of the remaining pair of pistons and use your brake lever to slowly and carefully ease the remaining piston out of its seal so you can clean more of the shaft. Once that is done, push the clean piston back in and repeat the procedure.
Finally, switch the bleed block to the clean pistons and do the remaining pair. Gently press the pistons back in and replace your pads and you're ready to get riding.
Since parts like brake pads are getting scarce, we're going to be checking out some after-market pads. These ones are from MTX Braking. These are their Red Label 'Race' ceramic compound, designed for power and silence. I'll also be trying their Gold Label HD pads aimed at a more heavy duty experience for extra durability and 'control.'
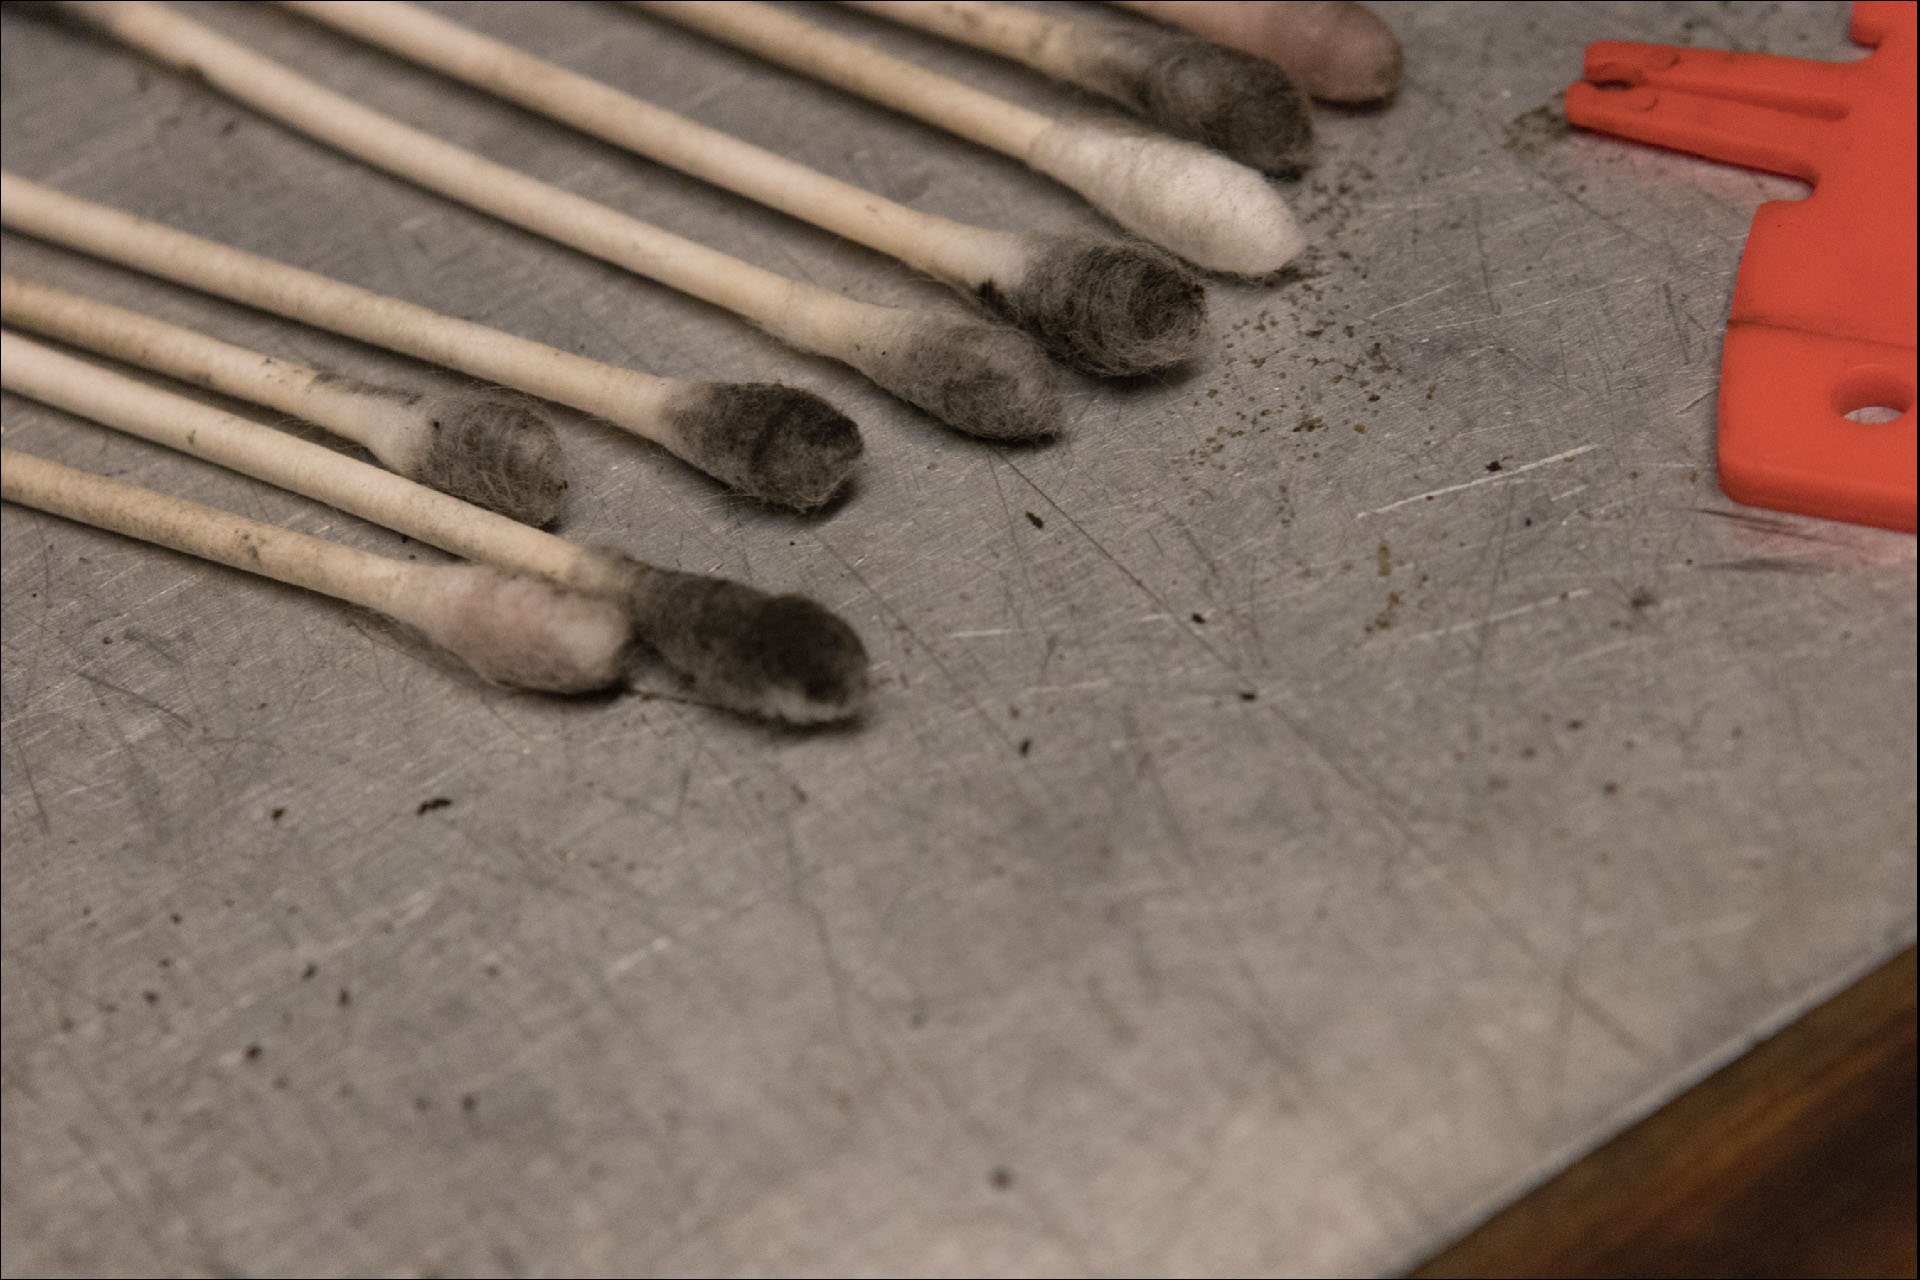
I told you this was satisfying! I used about 3-Tips per piston.
Some maintenance tasks are more frustrating than others. For me that is often bleeding brakes but for others mounting tubeless tires or installing inserts is on that list. As with most things in life, I find the more I roll up my sleeves and dive into tasks, the easier they become. And that ease seems to ramp up as I dig into more complex tasks over time. This however, is on the list of projects that are highly satisfying without any frustration to dim your enthusiasm. Just remember to keep those pads and rotors clean, and reward yourself with another tallboy once you're done.
If you have additional tips or corrections, they would be an excellent addition to the comments.


Comments
YDiv
3 years, 1 month ago
If you wanted to do a really fast cleaning, you could stick the largest allen key you can fit in the smaller slot of the caliper, and it should be enough that none of the pistons will pop out. See 3rd, 4th, and 5th pictures from bottom: If you look at the caliper front to back, the top half is narrower than the bottom half. The size of that gap depends on brand, but it's usually somewhere around 3-4mm.
I find this trick works to get all the pistons out relatively quick, even if they don't move at first, because the other ones will stop once they hit the allen key and the only thing that's left to move is the sticky piston. Only tricky part is pushing the pistons back in since a tire lever usually won't fit. I've used the same allen key by rotating it 90 degrees then pressing on both ends. Haven't cracked any pistons as of yet, but ymmv.
You can also use this technique with pads installed as a way to narrow the gap while maintaining alignment, and then make minor adjustments by hand once you fit the rotor in.
Reply
DMVancouver
3 years, 1 month ago
The Allen key piston spacer trick works quite well, at least on 4-piston SRAM brakes. A friend did it on 2-piston Shimanos and one of the pistons extended a bit crooked and leaked fluid, so I guess a bit of care is needed.
It’s easy enough to push the pistons back in with a tire lever if you pull the Allen key out. I suppose the other pistons could over-extend when pushing one piston in, but it hasn’t happened to me yet.
Reply
YDiv
3 years, 1 month ago
Interesting to note, thanks for sharing.
Yep, a lot of my experience is from doing this on Codes. Have been able to do the same thing with Magura too.
I've seen the opposing piston move ever so slightly when pushing one back in, but like you said, it's yet to screw me over.
Reply
DanL
3 years, 1 month ago
this is a problem crying out for a 3d printed solution - a set of blocks with one gap for a single piston to extend into
Reply
YDiv
3 years, 1 month ago
Funny enough that you mention this. I've been thinking about doing that for a while now, just too lazy to do all the measurements.
Reply
DanL
3 years, 1 month ago
Yeah, I built something out of wood for a while but, the laziness.....it got me....
Axel Ericson
3 years, 1 month ago
Taking a bleed block (maybe one of these yellow ones from shimano) and cutting out 1/4th of it works superb. Not difficult to do with quite literally any saw.
Reply
Cam McRae
3 years, 1 month ago
Good tip!
Reply
Brian Debenham
3 years, 1 month ago
I use a 75 cent block to keep my pistons from extending too far (3 quarters taped together). I've never popped a piston using this method, and then I soak a shoe string in isopropyl and "floss" around both pistons (2 piston XT brakes). I now have 4-piston Zee brakes so I will either try to extend my 75 block, or see if I need to double my investment to two 75 cent blocks. The shoe string floss works exceptionally well.
Reply
JVP
3 years, 1 month ago
Be suuuper careful pushing those ceramic Shimano pistons back in, they damage quite easily and Shimano didn't sell parts for a rebuild last time I looked.
Reply
Cam McRae
3 years, 1 month ago
Good point. I always try to use a tool that spans the gap in the middle to distribute the pressure between the two sides and be as gentle as possible. That would be an expensive error.
Reply
Gage Wright
3 years, 1 month ago
Hey Cam, can you do some in depth analysis at the min max of brake levers for Shimano? I hear the XTR lever are relatively cheap ($140.00) and much more durable with a fairly solid lever blade while the XT and SLX lever blades are more of a hollow taco design where the lever blade is closest to the lever body, much like sram. One of the reasons I turned away from sram brakes is that the lever blades melted away like hot butter in my hands (4 blades on one year all bent and trashed). I am on saints now but would XTR levers and SLX calipers or some sort of mix-match make sense?
Reply
Cam McRae
3 years, 1 month ago
I have some XTR and deore brakes so I’ll see what I can decipher. Good suggestion!
Reply
Gage Wright
3 years, 1 month ago
I also wonder if you can take a XT or SLX brake lever and change just lever blade with the XTR model? I think deore is all riveted together but the other models can be repaired with replacement parts, correct?
Reply
JT
3 years, 1 month ago
Super good point on that, and it applies to the phenolic units most big co's use as well. I will add the voice of, "However..."
If you look around on other mass commercial websites, you can find phenolic caliper pistons for much of Shimano's line up, even the 4piston jobbers. You will of course void your warranty. You can ask me how I know in a DM :D
Reply
Skooks
3 years, 1 month ago
Very good point! My trick is to install a set of worn-out pads first and pry against those to re-seat the pistons.
Reply
Gage Wright
3 years, 1 month ago
I keep an old set of pads as a buffer between my pistons and my piston tool. You can lever away when you have the old pads in and never a worry for the pistons
Reply
Skeen
3 years, 1 month ago
How about just open the master bleed port so you can push the pads back without much force? Or am I missing something?
Reply
Andy Eunson
3 years, 1 month ago
I’ve read and been told that this is a good idea. Andrew Major told me that people have damaged the master cylinder seals or bladder by not doing this. Interesting discussion about lubricating the pistons or not. Park tool have a video of this process where they do lubricate the pistons. I am thinking that what we want is pistons that have equal drag so that the react the same on both sides. I’ve wondered if a lazy piston is from one sticking or the other being too slick. Thinking about it, if you pump a piston out beyond the depth of the square seal and push it back in, that part of the piston is being bathed in fluid. I’ve always cleaned with a q tip dunked in brake fluid. Once the piston are pushed back in their bores I flush with lots of soapy water and run a rag or blue towel through.
Reply
Cam McRae
3 years, 1 month ago
I almost feel like I might have said that. ;)
Reply
Mammal
3 years, 1 month ago
Great service tip. My household brakes are all shimano, and I try to do this every time pads are swapped out. An old tooth brush works great as a caliper scrubber along with the Iso.
Reply
Skooks
3 years, 1 month ago
Also, dental floss works great for cleaning the pistons once they are extended.
Reply
IslandLife
3 years, 1 month ago
Perfect timing, as ski season is winding down, and the kids have a Spring Break MTB camp coming up, I'm taking a half day to pull their bikes out today to clean them up and get them ready to roll. Will be cleaning and bleeding brakes along with adding droppers (will be their first time experiencing the awesome-ness of riding with a dropper), so this is great, thanks!
Reply
danimaniac
3 years, 1 month ago
Why don't you clean using brake cleaner (spray)?
I think I got my procedure from the dominion teardown on here:
Remove wheel and pads (obviously)
Extent pistons as far as you dare without pushing them out of the seals
Spray with disc cleaner and wipe off, let dry
Lube pistons with dot (on my hayes) and du a bit of piston-gymnastics, then push 'em back.
Spray again to remove all excess of brake fluid
Reinstall pads, wheel, etc... Sip rest of beer, bed in new pads like a maniac and let the neighbours hear your joy!
Reply
jdt
3 years, 1 month ago
This is a really great breakdown. Thanks. I'll be referring to this directly as I clean my brakes.
Reply
YDiv
3 years, 1 month ago
Putting this here because someone else probably had this problem.
Hope floating rotors are notorious for rubbing on caliper mounts because of those ridiculous rings they put in it. It's especially likely to happen if the inboard pistons are much more active than the outboard ones, causing you to have to shift the whole caliper inboard to adjust, which brings the rotor and mount even closer.
Cleaning and exercising the pistons might help to balance out the friction and hopefully re-center the caliper, but barring a full rebuild*, just get a different rotor.
*You do have the option of grinding down your caliper mount, but personally I am not down for that.
Reply
papa44
3 years, 1 month ago
Aren’t you supposed to centre the empty calliper on the disc and then fit the pads? I thought the pads were self setting?
Reply
WalrusRider
3 years, 1 month ago
Haven't even read the article yet but this is such good timing. My nearly-new Code pistons are already sticking and not pulling away from the rotors enough to avoid rubbing.
Reply
Hollytron
3 years, 1 month ago
Remove the pads and make a two rotor sandwich with some old rotors (you can use the ones on yr bike but you will have to clean them like a maniac jusr use old ones). Stick the rotor sandwich in the caliper and pull the lever till the advanced pistons grip the paired rotors. Use a toe strap on the brake lever clean the pistons (sram guy said use water and DO NOT lube with dot) and leave it for 20mins or so. Remove the strap push the pistons in put the pads back in (clean em first!) Clean yr rotors and put the wheel back in and depress levers till you get pad contact.
This is the way
Reply
Mammal
3 years, 1 month ago
Interested. Any idea why they suggested not using DOT for cleaning Sram calipers?
Reply
JT
3 years, 1 month ago
Lubing pistons decreases piston retraction. The piston requires a bit of friction with the seal to have the proper amount of retraction. Lubing the piston decreases the friction between the 2 parts, resulting in the piston sliding through the seal too much. This goes contrary to a lot of comments on forums. Conversely the opposite is true. Too much friction prevents the piston from slipping properly, resulting in a mushy/poor bleed feel at the lever.
Reply
MuscogeeMasher
3 years, 1 month ago
I was hoping for a robust discussion of do you or do you not lube the pistons with brake fluid. I've always not done it, but will be very curious to see the comments. Maybe the NSMB people can reach out to some industry people and ask them not what the manufacturer recommends, but what they do on their own bikes (or their racers' bikes). As a manufacturer, you'd have to be a special kind of stupid to recommend this to the general public.
Reply
Mammal
3 years, 1 month ago
Yeah, I usually lube the shimano pistons with Mineral Oil, but I haven't considered the friction aspect, as mentioned above. I always thought the recommendation to not lube with fluid was due to ham-fistery, and people fouling their pads when they don't know what the heck they're doing.
This is the kind of back-and-forth I love reading, so the more opinions, the better.
Reply
Skooks
3 years, 1 month ago
I always lube the pistons on my Shimano brakes after extending/cleaning them. I use mineral oil or tri-flow. No issues yet.
Reply
JT
3 years, 1 month ago
The system lubricates the pistons from the inside-out. Applying fluid externally can lead to inadvertent pad/rotor contamination or too much piston slip. See DMVancouver's bit below. FWIW, I use a chunky pad spacer (the old Hayes ones work a treat). Leave one pad on the piston, insert pad spacer, and pump the brake lever until the piston without the pad on it contacts the spacer. Remove the spacer and pad, push the piston back in, and repeat the process 2-3 more times, then do the same thing to the other side. This works on 2 or 4 piston brakes regardless of manufacturer, and has taken care of much of the wandering bite point issues I had on one set of my SLX brakes and my GRX ones as well. My other set of SLX's required a bit more work and tinkering as the problem reared back up worse on a night ride in 0F temps.
Reply
Hollytron
3 years, 1 month ago
This method was relayed to me by the SRAM folks. The code and guide caliper uses a square seal to lie flat on the pistons. They get plenty lubed from holding back the dot in the caliper and external oil only gets dirty and can contaminate pads.
Reply
Skeen
3 years, 1 month ago
I have been diving deep on the Frankenbrake discussion on ride monkey. Brake nerds there recommend a grease that is compatible with mineral oil or dot accordingly, but not brake fluid because it washes away too quickly. And definitely a very light coat so as to not get everywhere and contaminate the pads.
I appreciate the comment above, warning about over lubing pistons and needing some friction. I hadn’t heard of this but it makes sense. I may not lube after cleaning unless I notice an issue although I have never done a piston cleaning myself yet. I will be a bit worried about accidentally pushing out pistons, I have done that before and it sucked (do brake work with scrap cardboard floor protector in case of spills) but didn’t ruin the calipers.
Great article overall, I appreciate the pictures and that diagram from park. Cam, just check step 2 for 4 piston calipers. In the same section I believe you refer to the calipers and the pistons as rotors. Not a big deal, obviously just a typo/ brain fart but something to maybe edit. Thanks for the write up!
Reply
YDiv
3 years, 1 month ago
I think this reflects a larger trend that you see in mountain biking. Everyone comes up with their own theory, and then you'll always find another theory that literally contradicts the other one. I think it's good to pool a diverse range of opinions, but at the same time you run the risk of misinformation being spread.
Regarding using grease, there are a lot of people out there saying you can use silicone lube if you're getting sticky pistons that won't extend. They suggest silicone because it's DOT compatible and all that. But unless your brakes start with H and end with -ope, I wouldn't recommend it.
SRAM specifically states to not use any grease on the seals or else they won't retract properly. I think Shimano is the same, would have to check again.
For some reason Hope is different, they recommend using "Hunter's silicone lube" if you have stiff pistons. No idea how they're able to do that, but it is what it is.
Reply
Lornholio
3 years, 1 month ago
I used to use Castrol Red Rubber Grease to lube Shimano pistons (usually Zees) after cleaning every pad change or two which is widely recommended for automotive brake seals. I changed to a mix of grease and mineral oil a couple of years ago thinking it would be easier to apply and find that the pistons last longer now before going sticky.
A Shimano yellow bleed block with one quarter removed is a very useful tool to make for isolating single pistons. I clean and lube all pistons (Q-tips for cleaning, small paintbrush for lubing), reset them all and then check how evenly they advance from a couple of lever pulls. Then isolate each piston to work it in and out a few times, more for the stickier pistons. Reset them all and clean the caliper thoroughly inside & out with a rag sprayed with isopropyl.
DMVancouver
3 years, 1 month ago
I made the recent discovery that cleaning sticky pistons is often what is needed to solve spongy lever feel, rather than a bleed. In the past, I had bled brakes with little improvement to lever feel, and I suspect sticky pistons were the issue.
Another important tip is to balance the pistons when the pistons advance with pads and rotors in. If one piston is advancing too quickly, use a small flathead screwdriver to push the piston back in (with the wheel and pads installed) to allow the other pistons to catch up.
I’ve also stopped lubing pistons with brake fluid; there is too much risk of contaminating the pads. The pistons get lubricated by the fluid in the system. Repeating the process of extending pistons, cleaning then pushing them back in several times seems to do the trick.
Reply
JT
3 years, 1 month ago
Big plusses for the third paragraph. I've found that exact trick to remedy most of the Shimano wandering bite point issues on their brakes using the white ceramic pistons (SLX and up on MTB, GRX/Ult/DA on Road. None too sure about the 105). Even if it doesn't 100% remedy it, it does a good enough job to make it less of an issue.
Reply
cyclotoine
3 years, 1 month ago
Tell me more about those soft jaws, where did you obtain them? I need better ones than the beat up cheepos that came with my vice.
Reply
YDiv
3 years, 1 month ago
Search up soft jaws on amazon, those seem to be some pretty standard TPU rubber ones.
If you want a cheap alternative for flat aluminum soft jaws, get an aluminum edge from home depot and cut it into two pieces. Not as nice as some actual machined aluminum ones that are magnetic, but a pretty good budget alternative if you want to do suspension work.
Reply
Cam McRae
3 years, 1 month ago
Amazon. They are magnetic and work really well.
Reply
Cam McRae
3 years, 1 month ago
These are the ones I have.
Yost Vises UP-360 Universal... https://www.amazon.ca/dp/B01EVQH42U?ref=ppx_pop_mob_ap_share
Reply
Pete Roggeman
3 years, 1 month ago
Purchased!
Reply
4Runner1
3 years, 1 month ago
I’ll just admit that I have never cleaned my brake pistons before. Thanks for the article, Cam. My Codes are gonna get a good cleaning!
Reply
trumpstinyhands
3 years, 1 month ago
Re lubing the pistons. Sram officially say that you don't. Shimano officially say that you do. Welcome to bicycle component engineering ;)
Reply
Cam McRae
3 years, 1 month ago
Awesome sleuthing!
Reply
Timer
3 years, 1 month ago
My takeaway from that is that it doesn't matter. There may be pros and cons to both, but they are either too small to matter, or balance each outher out.
Reply
Velocipedestrian
3 years, 1 month ago
Hey Cam, tiny correction. Your picture captions say rotor a few times, when you mean pistons.
Good article, and good reminder.
Reply
Cam McRae
3 years, 1 month ago
Thanks. I always appreciate those kinds of notices. I might have been burning the midnight oil!
Reply
cheapondirt
3 years, 1 month ago
I did this procedure recently when I realized my brakes were nowhere near centered on the rotors. I tried to reset the pads, but the pistons on one side were stuck and the effect was to drag the whole caliper off center even when it was tightly bolted on. Odd, given some mechanical calipers only move on one side by design; now I'm second-guessing that diagnosis. Anyway, it worked. With clean pistons, the calipers are staying centered and lever feel improved a little.
Reply
Mike Wallace
3 years, 1 month ago
With Magura brakes you definitely want to lube the pistons with the mineral oil after cleaning. Otherwise they can dry out and stick worse than before you cleaned them. Learnt it the hard way.
Also it would be great to find an alternative to q-tips. I use them too but it is sometimes hard to get to the back of the piston. I have heard cleaning string recommended but haven’t found any yet.
Reply
Cam McRae
3 years, 1 month ago
I bet some soft cotton twine would work well in place of Q-Tips.
Reply
Timer
3 years, 1 month ago
Pipe cleaners?
Reply
Vik Banerjee
3 years, 1 month ago
I've got a suspension bearing replacement & brake/fork service procrasti-planned for my FS rig anytime now. I'll book mark this article as a reminder to clean the damn pistons while I am at it! Thanks for the reminder. It's like flossing I know I should do it, but then....
Reply
Lu Kz
3 years, 1 month ago
Did the whole NSMB crew contribute to this one or?
Reply
Cam McRae
3 years, 1 month ago
Oops. Thanks for the heads up. We try to never post articles without attribution. Alas, we have no anonymous 'wrecking crew.' Industry legend says that MBA stopped attributing articles to writers when Zap Espinosa gained some notoriety and was hired away by Rodale to work at Bicycling.
Reply
MuscogeeMasher
3 years, 1 month ago
While we are talking "brake topics people disagree on" and since brake cleaner is mentioned above, any thoughts on it vs isopropyl alcohol? I've heard to avoid automotive brake cleaner. Accurate? Bike-specific cleaner better than isopropyl?
Reply
Andy Eunson
3 years, 1 month ago
Someone gave me a spray can of motorcycle brake cleaner a while back. The active ingredient was acetone. Acetone will damage some plastic like the plastic on old SRAM 9.0sl derailleurs or plastic fenders. Perhaps the concern is the rubber seals or brake lines? Or whatever adhesives are used to bond the brake pad material to the backing plate? I don’t know but I don’t use it anymore.
Reply
danimaniac
3 years, 1 month ago
well $h!t
now you got me thinking. I will check the ingredients... While spraying into the caliper I always hold a piece of cloth around it though... Might not be too bad. Up until now, I have not seen anything suspicious.
Reply
Andy Eunson
3 years, 1 month ago
This comment has been removed.
Cam McRae
3 years, 1 month ago
Apparently some automotive brake cleaners can contain oil to prevent rust. It seems the general consensus is isopropyl.
Reply
Cam McRae
3 years, 1 month ago
Apparently some automotive brake cleaners can contain oil to prevent rust. It seems the general consensus is isopropyl.
Reply
MuscogeeMasher
3 years, 1 month ago
Thanks! That's always been my understanding of why you don't use them. Leave a film/residue. Have also heard the thought/hypothesis that bike brakes don't get hot enough to burn it off while automotive and moto brakes do. Will stick with isopropyl.
Reply
Please log in to leave a comment.